How to Plan the Perfect Gravel Cycling Route
Disclaimer: This post contains affiliate links, through which we earn a commission.
Planning an off-road adventure on your bike? New to gravel cycling? Looking for some new gravel roads to explore? If you answered yes to any of these questions, then this post will help you to plan out the best route for your next gravel ride. I’ll walk you through some of the websites and online resources that can help you stay safe while venturing into the unknown yet still, and most importantly, have an epic time riding some sweet gravel roads.
Whichever way you look at it, the one undeniable thing that can make riding a bike outdoors more enjoyable is to have a good plan. A wise family member once schooled 15-year old me with the following advice before a big bike race by pointing out the 5 P’s of a good ride; “Proper Preparation Prevents Poor Performance.” In particular, cyclists need to be as prepared as possible when it comes down to the route that they intend to follow. It really helps to know what lies ahead during the ride, so that you’re ready for any unforeseen circumstances. The amount of food and water you need to carry, what equipment to use (think correct tire sizes) and the amount of time you will be outside (think correct clothing choices) all depend on the intensity, elevation gain and distance of the route that you will follow.
I’ve discovered that additional confidence during the ride comes from having the route carefully planned out before setting off. You won’t be caught off-guard by a sudden sharp corner or steep climb. By researching your route ahead of time, you’ll know what to expect. Your foresight will minimize the stress that comes with navigating new and unknown places, increasing the enjoyability of the ride. It’s one thing to venture out onto new roads on a road bike, but gravel riding requires even further preparation. You never know where you might end up, sometimes without cellphone reception to rely on to get you home.
I have a variety of resources that I like to use to plan out the new routes. I’ll cover them one by one in this write-up, but be sure to check out the video that goes along with this post to see how I use them all in combination. If mapping tools and planning out your own routes is not your thing, then skip ahead to Section 5 for the quickest way to get started.
1) Strava
The first place I go to plan out a new route is Strava. The community-based data source offers so many useful features for building the ultimate route. Users from all over the world upload tons of data to this site daily and you can easily use this crowd-sourcing method to gain valuable insight about where to ride. When travelling to a new location it’s always hard to know what roads to avoid and which ones are better suited for cycling. Local cyclists that live and train in that area all the time have most likely figured out all the tricks and shortcuts about how to best hook up safe and enjoyable roads. So, how can you harness the collective knowledge of the crowd to plan your ride?
Let’s start with Strava’s Route Builder tool. At the top of your Strava home screen, you will find the “Dashboard” drop-down menu. Hover over this and select the “My Routes” option. You’ll be presented with a list of routes that you might have created in the past. We are going to plan out a new route, so click on the “Create new route” orange box at the top of the screen.
This is where the real fun begins. First, ensure that you have the “Ride” option selected in the top menu bar, specifying bike rides, rather than runs. We want to tap into Strava’s rich database of user information to see where other cyclists ride. Click on the small gear icon on the left-hand side of the screen to reveal a menu with options that can be changed. We are looking for is the “Global Heatmap” option. This is turned off by default. Flip the switch to reveal a new layer added to your map. Notice how certain roads on the map are now lit up with a red color. This represents the data from the whole Strava community. All the activities ever uploaded to Strava get pulled into the Global Heatmap to highlight the routes that cyclist have taken in the past. The darker the red color of the route, the more travelled a particular road. I’ve used this particular tool so many times when traveling to a new place. Without any prior knowledge of the area, the Global Heatmap immediately reveals the most popular routes in any particular area.
I’ll demonstrate how to use Strava’s route builder to piece together the actual route in a later step. At this stage we will simply inspect the maps to gain a greater understanding of which roads to take.

The Global Heatmap highlights all the roads that cyclists have taken during past activities.
The Strava route builder tool does however have a few shortcomings. The biggest of which is that no distinction is made between tarmac roads and gravel roads, as is evident in the image above. In past experiences, I’ve planned out what I expected to be the ultimate road riding routes, only to get stuck with my road bike on some nasty gravel sections. The opposite is also true. If you’re out on a gravel bike, you don’t want to miss out on an epic unpaved section only because it’s been overlooked by other Strava members. Consider the map below.

The light blue line shows a road less travelled by cyclists – maybe a gravel road?
The faint blue line along the Hughesville road indicates that few people have gone down that road. I can confirm that this particular section of the Hughesville road is a really nice section of gravel. Pro tip – If you are a gravel road hunter, then that blue line should be the perfect tip-off to a gravel section. The fact that all the other roads are so frequently travelled, but this one section remains relatively untouched means that the road riders are most likely avoiding it due to the gravel surface. However, it’s not enough simply to guess if a road is suited for gravel riding. Instead, we’ll study the roads with the website that’s discussed in the next section.
2) Gravel Map
I’d rate Gravel Map as the most useful resource on my list. I only discovered this website a short while ago, but it has totally changed the way in which I plan out gravel rides. Just like Strava, this website is community driven, meaning that members can log on and specify which sections are gravel. Take a look at the screenshot below and notice the gravel sections highlighted in a yellow color. Another neat feature of the site is that users can even add photos of certain gravel roads to highlight what the surface level looks like. As seen in the image below, there are three small thumbnails of photos in the top right-hand corner, to indicate roads with photos from users.
Considering the full view of the map and looking at all the yellow highlights, I think you can agree that I am pretty spoiled to have so many gravel roads from which to choose in the region around Purcellville, Virginia – a mere 45-mins outside of Washington DC. Be sure to check out your local stomping grounds to see if there are any gravel roads with which you might not be familiar. Gravelmap makes it super easy to spot the distinction between paved and gravel roads.
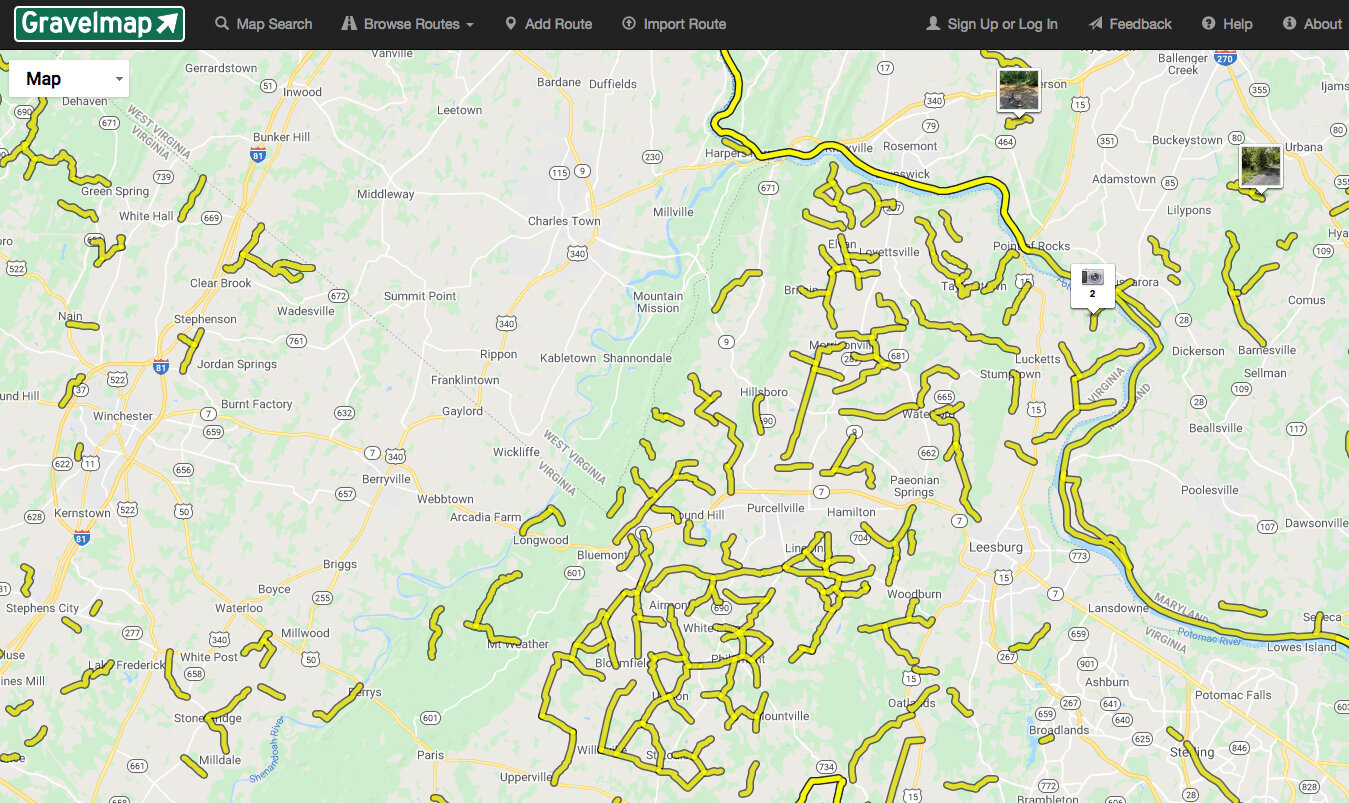
Gravelmap site shows all the gravel roads overlaid onto the map.
Let’s take a closer look at the Hughesville road example I pointed out earlier to show you how easily I can tell that this road is indeed a gravel section. As can be seen in the map below where I’ve inserted a dotted red circle to highlights the road, the gravel community identified this stretch as gravel. I switch back and forth between Strava and Gravelmap to pick the perfect route. There are two big questions that I consider at the beginning of the process: Is this road safe and travelled by others? Is it a gravel or tarmac road? Strava answers the first question, while Gravelmap answers the second.
It’s important to keep in mind when planning out a route that a particular section of road does not necessarily join up with the next. Consider the map as listed below once again. You will see that I highlighted a section with a red solid-lined circle and an exclamation mark. Through a quick inspection, one could easily make the incorrect assumption that the Hughesvilles road can be taken all the way to the end by continuing along that road. By taking a closer look, you may however notice the gap in the middle of my red circle. Notice the blue creek breaking up that road? The question now becomes if this is simply a road section that runs over the creek or if there is just no road there at all. The answer to this question can be found in the next section, with the discussion of Google maps.

Gravelmap can help to determine if a lesser travelled road is a gravel section.
3) Google Maps
Google Maps is an absolute must for anyone planning out a gravel ride. You might have used their navigation in the car or planned out your driving directions online numerous times, but let’s use this powerful mapping website for our gravel route planning. Next, we’ll discuss multiple features that make Google Maps such an invaluable tool for cyclists.
Standard Map View:
The first step that I recommend with Google Maps is to use the standard maps view. With this resource, I can inspect my Hughesville road example, instantly revealing that there really is no way to cross over the creek that we identified on Gravelmap.

Google Maps can quickly indicate the absence of any road.
Satellite View:
As a second step, just to be extra sure, I’ll make use of Google’s satellite map view to further inspect my route. The satellite view below provides a close-up look at the gap between the two road sections. Ultimately, I have to accept that the only way to get to the other side of the North Fork Goose Creek is to find a detour around it. Please don’t go trespassing on private property just to create shorter routes. The gravel riding community is still in its infancy and public perception will still be established by the actions of the early adopters of the sport. If we want to be respected on gravel roads in the future, we need to set the example that gravel riders are willing to stick to rules and respect boundaries.

Don’t assume roads can be connected and don’t trespass on private property.
Labels off:
Google Maps allows the ability to switch road labels on or off in satellite view and I’ll explain why you’d want to do this in the next paragraph. But first, here are the steps to toggle between labels on or off: Making sure that you are looking at the map in satellite view, click on the three-lined menu (some people call this the hamburger menu). At the top of the selection of menu items, notice the Satellite category with “Labels on” directly below. Click here for views with and without labels.
Why do you want to do this? With the labels view turned on, its not always possible to determine the surface of the road because Google overlays a line onto the road. By turning off the labels view, all overlays are removed, allowing a closer look at the surface level. The below image illustrates this point, continuing to use Hughesville as an example. If Gravelmap could not confirm that the road was indeed a gravel section, then the next step is to look at it on Google, with the labels turned off. The image on the left shows the “labels on” view. Notice the smooth gray overlay on top of the road that makes spotting the gravel surface very difficult. The image on the right shows the “labels off” view. With the overlays removed, it’s much easier to see the surface of the road. Pro tip – a general rule of thumb that can help to tell apart a gravel road and a tarmac road is the absence of any centerline or shoulder lines on a gravel road. This isn’t full proof, but it’s a good way to make a more informed call about the road surface.

Google maps satellite view with labels turned off confirms a gravel road.
Street View:
The last tool from Google maps that I rely on to plan out my gravel ride is street view. There is simply no better way to inspect a road than to look at it from ground level. Not all roads have however been captured by Google in the street view and some work arounds are often required.
First, let me show you how to pull up Google street view. Start on the standard map screen. Then simply drag and drop the yellow person icon in the bottom right-hand corner of the screen onto the map. Notice from the image below that certain roads will be highlighted in blue as you start to drag the icon onto the map. Only roads that are highlighted in blue are roads that have been recorded by Google from the street view perspective. You’ll see in my example below that while the Hughesville road cannot be viewed in street view, the connecting road can be seen. Pro tip – Google seldom records gravel roads for Street view. I suspect that Google’s vehicles aren’t rugged enough to go over such rough surfaces. This is a great hint that the road might be perfect for a gravel ride.
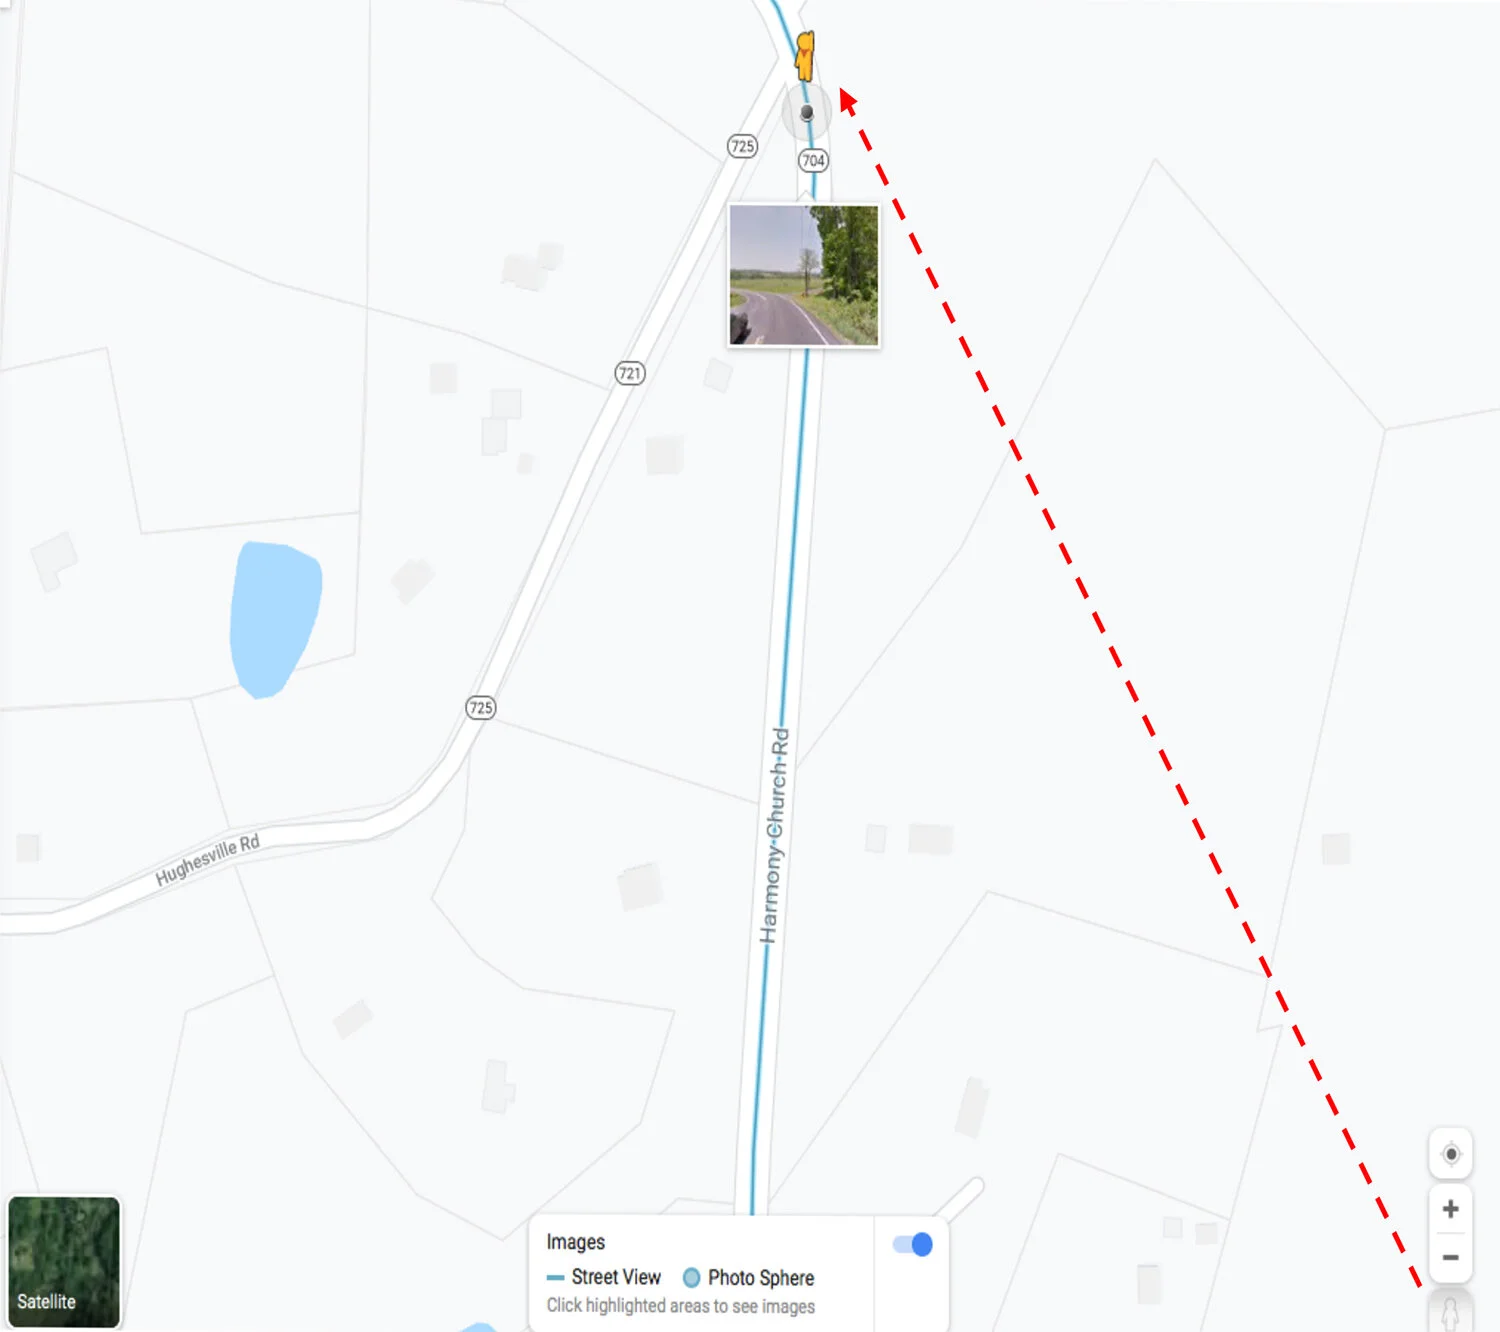
Street view: Click and drag the person icon to drop it onto the map.
Even though the full road is not visible on Google street view, this tool still proves helpful by allowing us to simply inspect the entrance to this road to determine what the road looks like. In the image below, I’ve dropped my street view icon at the point where Hughesville road connects to a tarmac road called Harmony Church. With this view, we can now easily tell that Hughesville turns into a very neat gravel section. I mean, just look at that road! It’s inviting you to ride into that tree line and explore it!

A zoomed in look at Google Street view shows an epic gravel road to explore.
Using the Google mapping tools in combination with Strava and Gravelmap, you have a host of resources with which to consult in order to plan out the most epic gravel ride. How you use them in your area will differ from the way that I use them. Maybe you have a few more trails that will require some additional satellite inspection or perhaps you strike it lucky and all the gravel roads where you live have been recorded on street view. Get creative! The planning process can actually be a lot of fun, like building a massive puzzle, with the aim to connect up new sections of road that you have not yet discovered. Like a proper TV infomercial, I just can’t resist to say: “But wait, there’s more!”
4) Local department of transport (Example: VDOT – Virginia Department of Transportation)
If you are still not satisfied with the above selection of tools, then why not expand your search to your state’s department of transportation. Because I live in Virginia, I will use the Virginia Department of Transportation (VDOT) as an example. The department’s website offers a bunch of interactive maps. We are most interested in the “Unpaved roads” map.
Take a look at the image below, which highlights all the unpaved roads across the whole state. Even for the most seasoned bike packer, an extensive map such as this one should provide for endless adventuring possibilities. Be sure to check out your local transportation department’s website to see if they have anything similar to help plan out some epic intrastate gravel adventures.

VDOT’s Unpaved Roads map view provides a full view of all the gravel roads across the state.
Perhaps you’ve been reading along and feel completely overwhelmed by the many ways in which to plan out your ride. Maybe as you read this, you’re screaming out at me; “Enough with all the mapping stuff! Just give me a route to ride!” Well, if that’s the case, this next section is just for you. Enter Ride with GPS! There are plenty of other map geeks, like me, out there that have created and shared thousands of awesome routes for fellow riders. Ride with GPS is yet another rich community-driven database with endless routes created by its users. There are a few different tiers of access on the website, with some information that’s only available to the users that pay the monthly subscription. The free version still offers a ton of valuable tools that can help with gathering some really interesting ideas for where to ride next.
At the top of the Ride with GPS page there is an option to “Find” new routes. Here you can easily search all the routes created and uploaded by other users. You’ll have the ability to filter the selection down to the exact kind of routes for which you are looking. In my example below, I did a quick search in the Purcellville area and even without any filtering was able to find a nice gravel route in the suggestions. You’ll be amazed at how many incredible routes other users have already created and saved for a particular area. Be warned though that you might find yourself spending hours on this site scrolling through all the different routes and looking at the pictures that the users have attached to the route.

Ride with GPS’s “Find” tool allows you to search for routes created by other users.
If you’re ready to use this resource, be sure to create an account at your preferred membership level. Once you’ve discovered a route that you would like to follow, pin it to your favorites. You’ll be able to see from my screenshot above that a small thumbtack icon follows the name of the route. Click on this to pin the route. You’ll be able to find all your pinned routes on your homepage, under the “Dashboard” section.
Ride with GPS does offer the ability to build your own route in a similar way that Strava does. See the “Route Planner” option on the page to access this tool. I’ll be honest and say that I’ve never really used this feature because I find the user interface for Ride with GPS to be a little more clunky to work with. I prefer the simple layout in Strava Route Builder for planning out my own custom routes. More about this later.
The main benefit with Ride with GPS is however the ability to download pre-designed routes without having to plan them out for yourself. This whole section is dedicated to those who want to have as little input with the map planning software as possible. I know, I still hear you screaming out; “Just give me the routes already!” We’re getting very close now. Just click on one of your pinned routes and you’ll find a screen similar to the one in my example below. Finally, we have what we were looking for, because as you can see from the screenshot, there is now the option to export the GPS file in the format of your choice.

A pre-designed route created by a user on Ride with GPS – ready for download.
For the majority of people out there who want to load this map onto a Garmin or Wahoo GPS head unit (or maybe even a Garmin watch), the .TCX format will work just great. I’ll show you in the last step how I add the .TCX file onto my Garmin device to have it ready for navigation during the activity. However, there are other devices that will work better with a .GPX or .Fit format file. Ride with GPS gives you the option to export in a variety of file formats. Simply click on the three-dot menu next to the Export button and then select “More export options.” The screenshot below shows you all the various export options, along with handy descriptions explaining which file format will work best with a particular device. If you are not sure which file you need, just go through the list one by one to pick the right option.

Ride with GPS offers a variety of options to export the GPS data file.
Die-hard Apple fans will be glad to know that Ride with GPS offers a really handy app that can be used in conjunction with the Apple watch for navigation. No need to carry that extra GPS unit on the bike. Simply download the route in the app (you’ll need to be a paying member of Ride with GPS to unlock this feature) and off you go. Using the Apple watch app will help you conserve battery life on your phone. Android users can also find an app for Ride with GPS.
Overall, this is a great resource that has allowed me to download a bunch of routes from other users, opening up countless new routes that I otherwise would never have known to take. I’ll end off this section with a Pro tip, along with a word of warning. Always be sure to do some research about the routes that you download from other users. It is not advisable to ride new and unfamiliar routes without any additional research. Make sure that you confirm that your selected route is safe and does not cross through private property. Restating what I said earlier – do not trespass.
6) Bike Shops
If you were riding a bike in the days before GPS units or Google Maps, you will know that the best way to gather information about where to ride has always been to ask fellow riders. Commonly, you might have met fellow riders at a group ride departing from a local bike store. That same method still applies today and is still one of the most enjoyable ways to discover new and exciting places to ride. The social element, along with the assurance that local riders will know all the details of a particular route, is what makes this method such an easy to get started. There are however a few modern ways in which bike stores can nowadays offer a new take on this traditional role of hub for route-related information.
To illustrate this point, I’d like to highlight two bike stores in my region that provide really useful resources for discovering new routes. Both Bicycles & Coffee in Purcellville, VA as well as Rocktown Bicycles in Harrisonburg, VA are wonderful stores that take a big interest in the gravel scene. Be sure to visit these stores if you are ever in that area, but also take some time to follow the links to their websites and look at the resources that they provide. Both bike stores offer multiple gravel route options to follow in their respective areas. The biggest bonus is that they have already gone through all the effort to upload their route suggestions to Ride with GPS, making it super easy to simply follow a link to that route file and download it for immediate use. It doesn’t get any easier than that! As you click around on their websites, you will see that aside from the Ride with GPS files, you can also find links to Strava activities, links to local transportation websites and even information about the routes for upcoming events. Bike stores that have kept up with the times by providing information in this way are true gems.

Screenshot from Bicycles and Coffee bike store website listing some Ride with GPS routes.

Screenshot from Rocktown Bicycles website listing some Ride with GPS and Strava routes.
Be sure to check out your local bike shop’s website to see if they have any handy resources listed that will provide you with a few suggestions of places to explore on your gravel bike.
7) Bringing it all together & exporting to device
So you’ve researched for hours and have discovered a ton of new and interesting routes that you would like to take. Now all you need to do is actually build the route that you want to follow. As a last step, we’ll take a look at how to piece it all together and get the route loaded onto your GPS unit. I pointed out earlier how we will come back to Strava’s Route Builder to get the actual route created. Well, here we go!
Building the Route:
Head back over to Strava and follow the same steps as before to pull up the Route Builder Tool (Dashboard -> My Routes -> Create New Route).
There are a few things that should be adjusted before you start building the route. First, turn off the “Use Popularity” setting in the top menu bar. This setting goes back to the Global Heatmap that I mentioned earlier and will select the route between two points based on the most frequently travelled route. This is not entirely what we want if we are trying to follow a new gravel route that has been less travelled by others.
Secondly, turn off the Global Heatmap setting that we turned on earlier. Why? Well, with the Heatmap setting turned on, you can only zoom into a map up to a particular point and no further. With this setting turned off, you can actually zoom into the map much more closely, a feature particularly useful when you are building ultra tricky routes that don’t really follow any specific road or trail. Zooming in close gives you pinpoint precision for placing waypoints.
One last word of caution when building out your route is to beware that you have the option to go into “Manual Mode” by using the toggle in the top menu bar. This allows you to go completely rogue and build whatever path you like. Strava will not try to attach your route to the nearest road or trail on the map - it simply creates a straight line between the points you selected. This is particularly useful if you plan to skip over some grass or cut through a route where there is no official road or trail. I’ve used the manual mode on many occasions when new roads are being built and the maps as listed on Strava still need to be updated. Manual mode creates an easy way to overwrite the maps.

Strava’s Route Builder with a short route created.
Okay, finally we have everything we need to create the route. Click on your starting point on the map and continue to add waypoints as you piece together the desired route. Switch over to Manual Mode when required to piece together sections that Strava wants to connect in the less than ideal way. Once you have your whole route created, you can hit the save button and it will then appear in the “My Routes” section. Next you’ll be able to select one of your routes from this page, with the option to Export the .TCX or .GPX file in a similar way to what was available on Ride with GPS. Now we just need to get the file loaded onto a GPS unit.

Strava Route with the options to Export the route to .TCX or .GPX files.
Before we get into the very last step of the process, let’s address the question that many of you might have at this time. Why use Strava’s Route Builder when there are a few other ways to create routes? I highlighted Ride with GPS’s tool that can do the same thing. Garmin also offers their own tool on Garmin Connect that can create routes, and if you are sending your route straight to a Garmin unit, then there is a case to be made to use that software instead. My simple answer to this question comes down to three things: manual mode, loops and ease of sharing a route. Strava’s manual mode is a big deal to me. I cannot tell you how frustrating it has been to create a route on other software only to realize that the route I wanted to create goes over a section that cannot be connected. The manual overwrite in Strava’s planning tool gets around that issue very easily. Garmin’s tool works great for point-to-point navigation, but try to build a route that consists of a bunch of loops, and it falls flat fairly quickly. With Strava’s Route Builder, you can go around the same loop as many times as you’d like without messing up the distance. The last of the three criteria relates to the fact that many other riders are already members on Strava and sharing a planned route with them is fairly easy. Even though I think Ride with GPS actually has an advantage over Strava when it comes to sharing routes and maintaining a catalogue of user-created routes, not everyone out there knows about or uses Ride with GPS. I suspect this might change over time, but for now, Strava is a convenient route-sharing options that offers a great amount of route-building features.
Loading the GPS route map onto your device:
So, we’re ready to ride then? Not so fast! The very last step in the process is to get your .TCX (or similar) file onto the device that you want to use for navigation. Whether you created this file yourself in Strava and exported it from there or if you simply downloaded a file from Ride with GPS, you will still need to follow these last few steps to load it onto your device.
Different device manufacturers will have different ways in which you can upload GPS course files. I’ll briefly show you how to do this for a Garmin device. Be sure to consult your manufacturer’s website if you need additional help.
Garmin users can navigate to Garmin Connect and Select “Training” and then “Courses” from the menu. You’ll be presented with the screen listed below. The option that you are looking for is kind of tucked away, but I’ve highlighted it for you in red on the image. By clicking on “Import,” you can then select the file that you want to upload.

Upload your .TCX file to Garmin Connect with the Import option.
At this point you have two options to sync the route to your Garmin device. You can either use the computer and a USB cable to transfer the .TCX (or similar) file over into the correct folder directory on the device or you can simply sync it from the Garmin Connect app (if your Garmin unit has that feature).

Sync your Route Map over to your Garmin device via the Garmin Connect app.
I like to have all my routes loaded onto my Garmin Connect platform. That way if I change my mind just before a ride, I can quickly pull out my phone and sync over the other route that I want to ride instead (without the need to have a computer nearby). Skilled Strava users will probably also point out that they don’t need to Export the route and then re-upload it to Garmin Connect because of the “Strava Routes” app that you can load onto a Garmin Device. Correct! However, I’ve found that the Strava Routes app is very slow and sometimes unreliable, so I much prefer to keep all my routes in both places (Strava & Garmin Connect), manually exporting and syncing routes as needed.
Once the sync completes, you are all set! Get out there and ride that perfectly designed route. While I like to rely on my trusty Garmin Fenix 5 watch for navigation, not everyone will be a fan of using a wrist-based device for navigation. If you are looking for a front-mounted device, I can definitely recommend the latest Garmin GPS units. Both the Edge 530 and Edge 830 are excellent devices that have had some significant upgrades from previous models. Having some sort of navigation device is definitely worth the investment, to ensure that you stay on course.
8) Wrap-up:
With all the various resources available today, you have everything you need for preparing a well-designed route for your next gravel ride. You’ve seen how you can use Strava, GravelMap, Google Maps, Ride with GPS, transportation department maps and also bike stores to gather an endless amount of information about where to ride your gravel bike. Whichever tools you use to create your routes, be sure to apply good common sense when out riding – trust your gut if a particular road feels unsafe. Do however be creative in your route planning and explore a few new routes this year. Part of the reason why we love cycling so much is the thrill of conquering the unknown and expanding our horizons. Challenge yourself and go see what lies on the other side of that hill next time you ride!
I hope you found this topic helpful and that it will lead to many new explorations on gravel roads in the coming season.
- Wiehan
Do you use any other tools to help plan out your gravel rides? Leave a comment below and let us know!
Like our photos? Check out our store to purchase a select print from this post!