Winterize Your Bike
Disclaimer: This post contains affiliate links, through which we earn a commission.
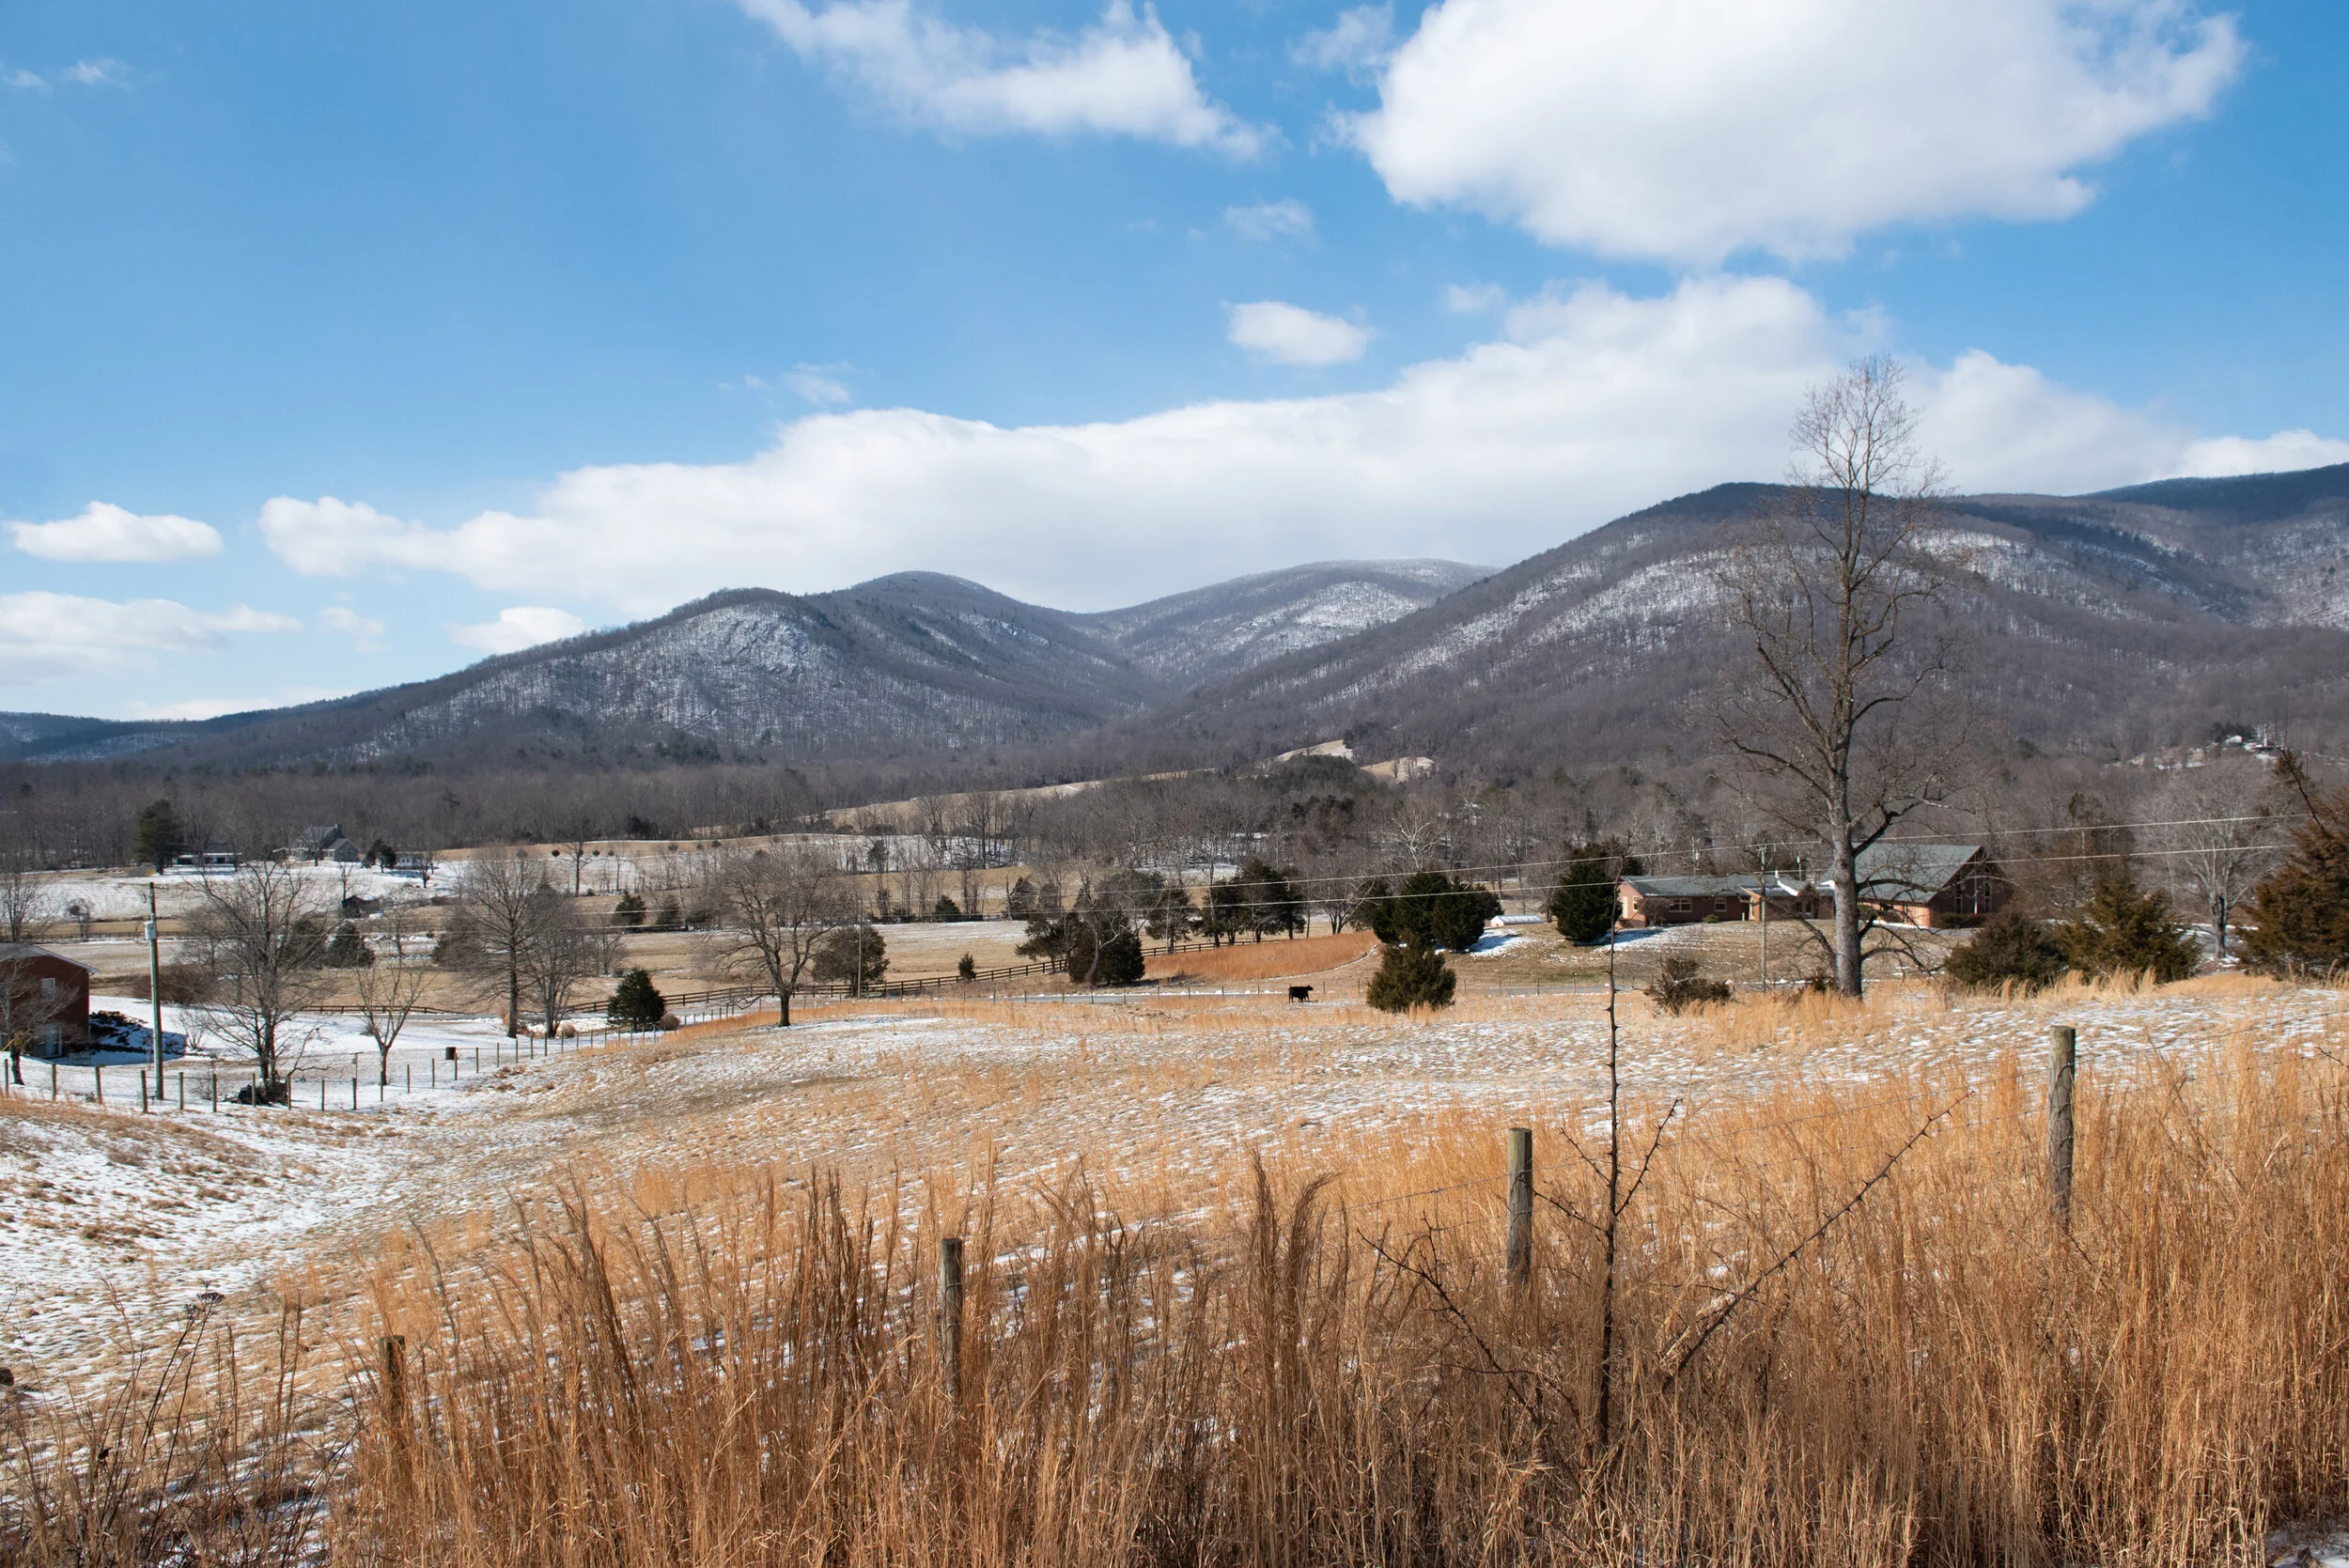
It’s that time of the year again when outdoor cycling becomes increasingly challenging. But don’t let that be an excuse to take the easy way out and just ride on an indoor trainer all the time. Wintertime is the perfect opportunity to develop a characteristic that’s sometimes overlooked when it comes to riding a bike: Grit. Simply put, winter is the perfect time to suck it up and experience the great outdoors in all of its fullness. The saying goes that “there is no such thing as bad weather, only incorrect clothing,” but equally as important are the preparations that can be made to your bike, which will allow you to see through a challenging season of outdoor activities. In today’s post and video, I’ll dive into a few modifications that I made to my gravel bike in order to be better geared for the colder, darker and wetter months ahead.
Always Riding Indoors - You’re missing out!
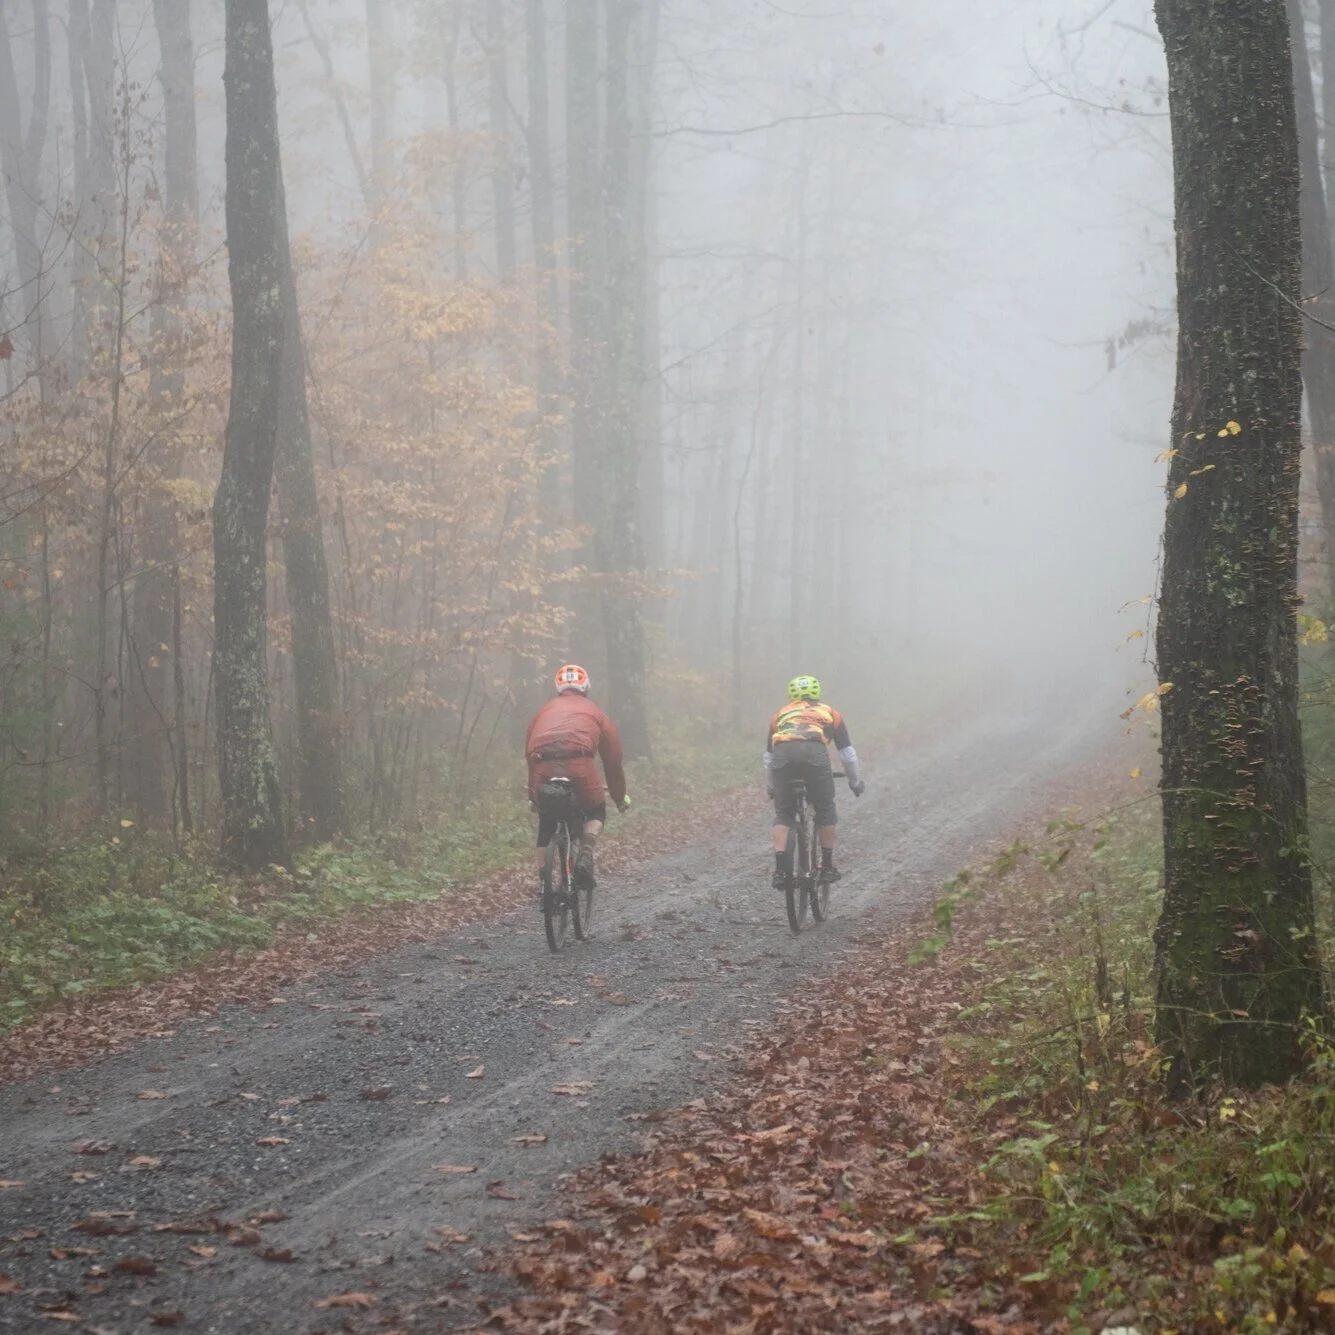
After struggling with a calf muscle injury for the longest of time, I finally came to the realization that the cause of the injury was in part related to the large volume of riding that I was doing on an indoor trainer. Not only was I damaging my body through this so-called “healthy,” yet unnatural activity, but I was also missing out on the incredible scenery that one can encounter in the real-world, when outdoor conditions are less than favorable. Sure, indoor training has it’s benefits - it’s more convenient and safe than an outdoor ride, and it’s easier to go all out, powering up the watts when you don’t have to worry about surrounding cars, pedestrians and animal crossings. However, the body and the bike were never really designed to function together solely indoors. The forces that act on joints, muscles and bike parts while riding on an indoor trainer are completely different to the perfect counter-balance system you find when riding outdoors. The bike and the road typically catch much of the impact outdoors. But in my experience, indoor trainers aren’t yet equipped to simulate the road well enough, instead channelling impact to the joints. It’s just not natural to sit in a heated room and stare at a screen, while smashing out high-intensity workouts. Where is the sense of exploration and adventure that led us to become cyclists in the first place? Mud, rain, snow, fog and cold air all add to the atmosphere of an unforgettable and epic ride! Just take a look at my recent Tour de Dirt Gravel Ride of the Week highlights video to see what I’m talking about.
Since making the connection between indoor training and my injury, I made a vow to never let an outdoor riding opportunity go to waste, even if it meant getting a bit dirty or cold along the ride. I’ve learned along the way that with the correct gear, you can make challenging weather conditions fairly enjoyable. Over the last few weeks, I’ve added a few accessories to my bike in the hopes that it can help see me through more challenging winter rides and I’ll give you a walk-through of my winterized gravel bike next.

My Winter Riding Setup
The main element that you’ll need to be prepared for during the wintertime is precipitation. Cold temperatures are, of course, a large part of the game, but we’ll leave that topic for a future blog post, as this relates more to the correct type of clothing. In this post, I’ll instead focus on the bike and provide you with 3 of the main winter modifications that you can make to your bike in order to be better prepared for the wet, muddy or snow-covered winter roads.
Winter-Mod #1 - Fenders
The first item on my list of winter bike accessories is mud guards. Love them or hate them, the truth is that they really can work wonders to help keep you dry and/or clean when out on a messy ride. Fenders come in so many shapes and sizes that it can sometimes get a bit confusing to determine what type of fenders work best with your bike. It’s certainly worth consulting your bike manufacturer’s website to determine if they sell any custom fenders that best fit on a particular frame. Most of the gravel bikes on the market today, however, make it very easy to fit a pair of fenders, since they offer all the required mounts to make this happen. There is, of course, also the option to find a set of fenders that simply mount onto the seat post, saddle rails or a part of the frame.


My 3T Exploro was a somewhat complicated bike to deck out with fenders, since no fender mounts are present on this frame. To make matters even more challenging, the seat post of the 3T is not round, but instead follows a more aerodynamic d-shape design, ruling out most of the standard clasp-on fenders on the market.
Despite the added challenges to my search for the right mud guards, all was not lost and after some browsing, I discovered the perfect solution for a bike that does not come with a standard seat post shape. The SKS-Germany X-Blade Fender comes with a very unique mount design that makes use of a non-slip strap instead of a standard round clasp. This means that it can fit around pretty much any diameter seat post, and in my case, even works perfectly to secure the fender onto a non-round seat post. This well-thought-out mounting design, which allows for tool-free operation, was most certainly the main feature that attracted me to this product.
I rank the adjustability offered by this fender just as highly as the mounting system. The dual point adjustment system gives you precise control over how you want to position the fender over the rear wheel. This means that it works great with both 700c & 650b wheels. I was able to dial in the perfect angles to prevent any mud from bouncing up to hit my backside. At only 228g, this purchase was the perfect addition to my bike, to help during those wet, muddy and/or snowy winter rides.


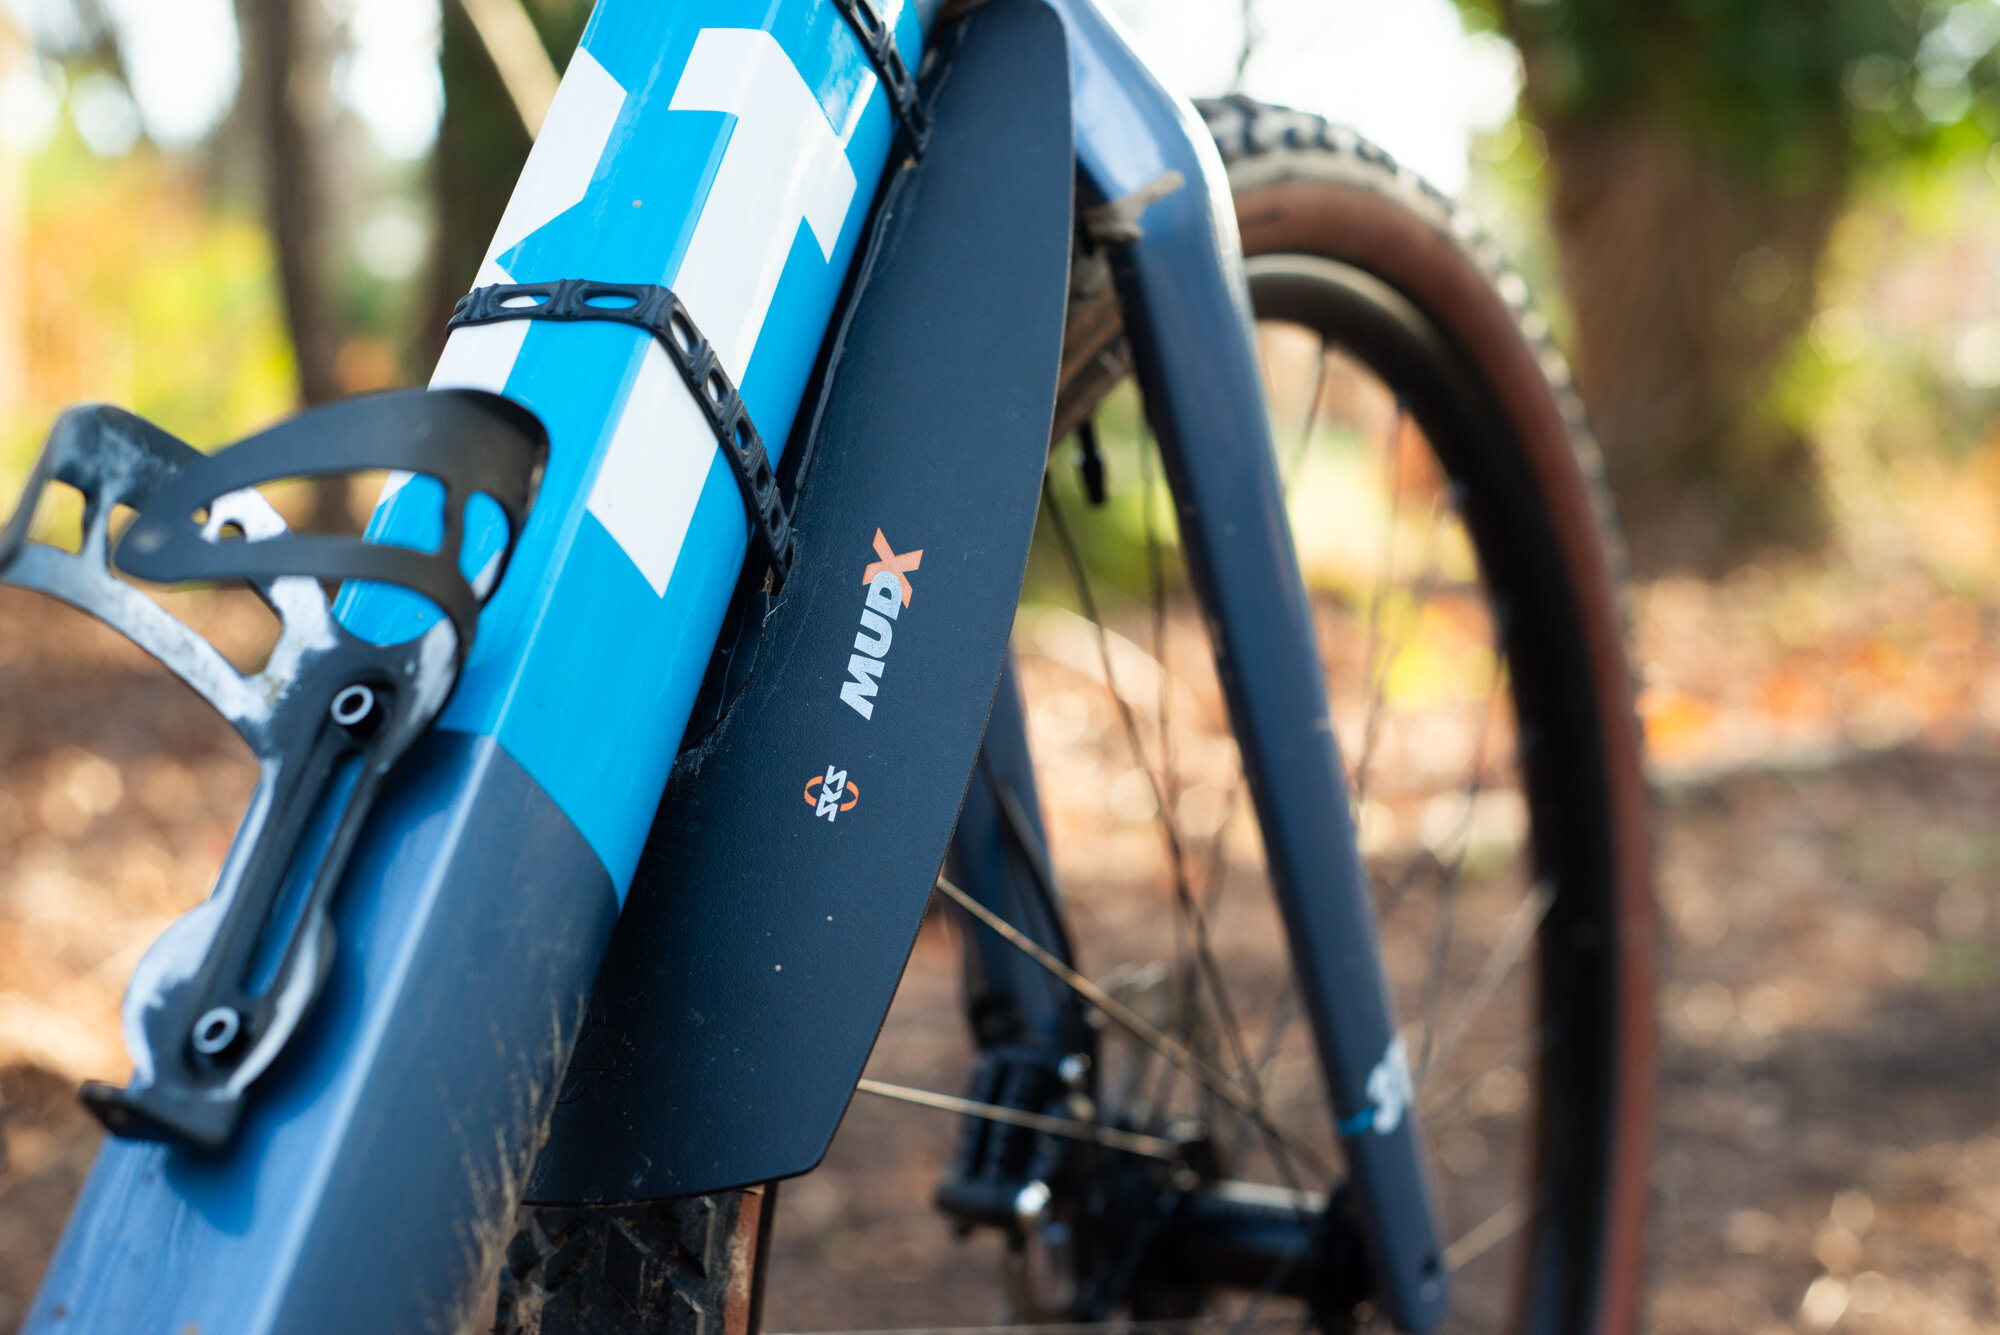
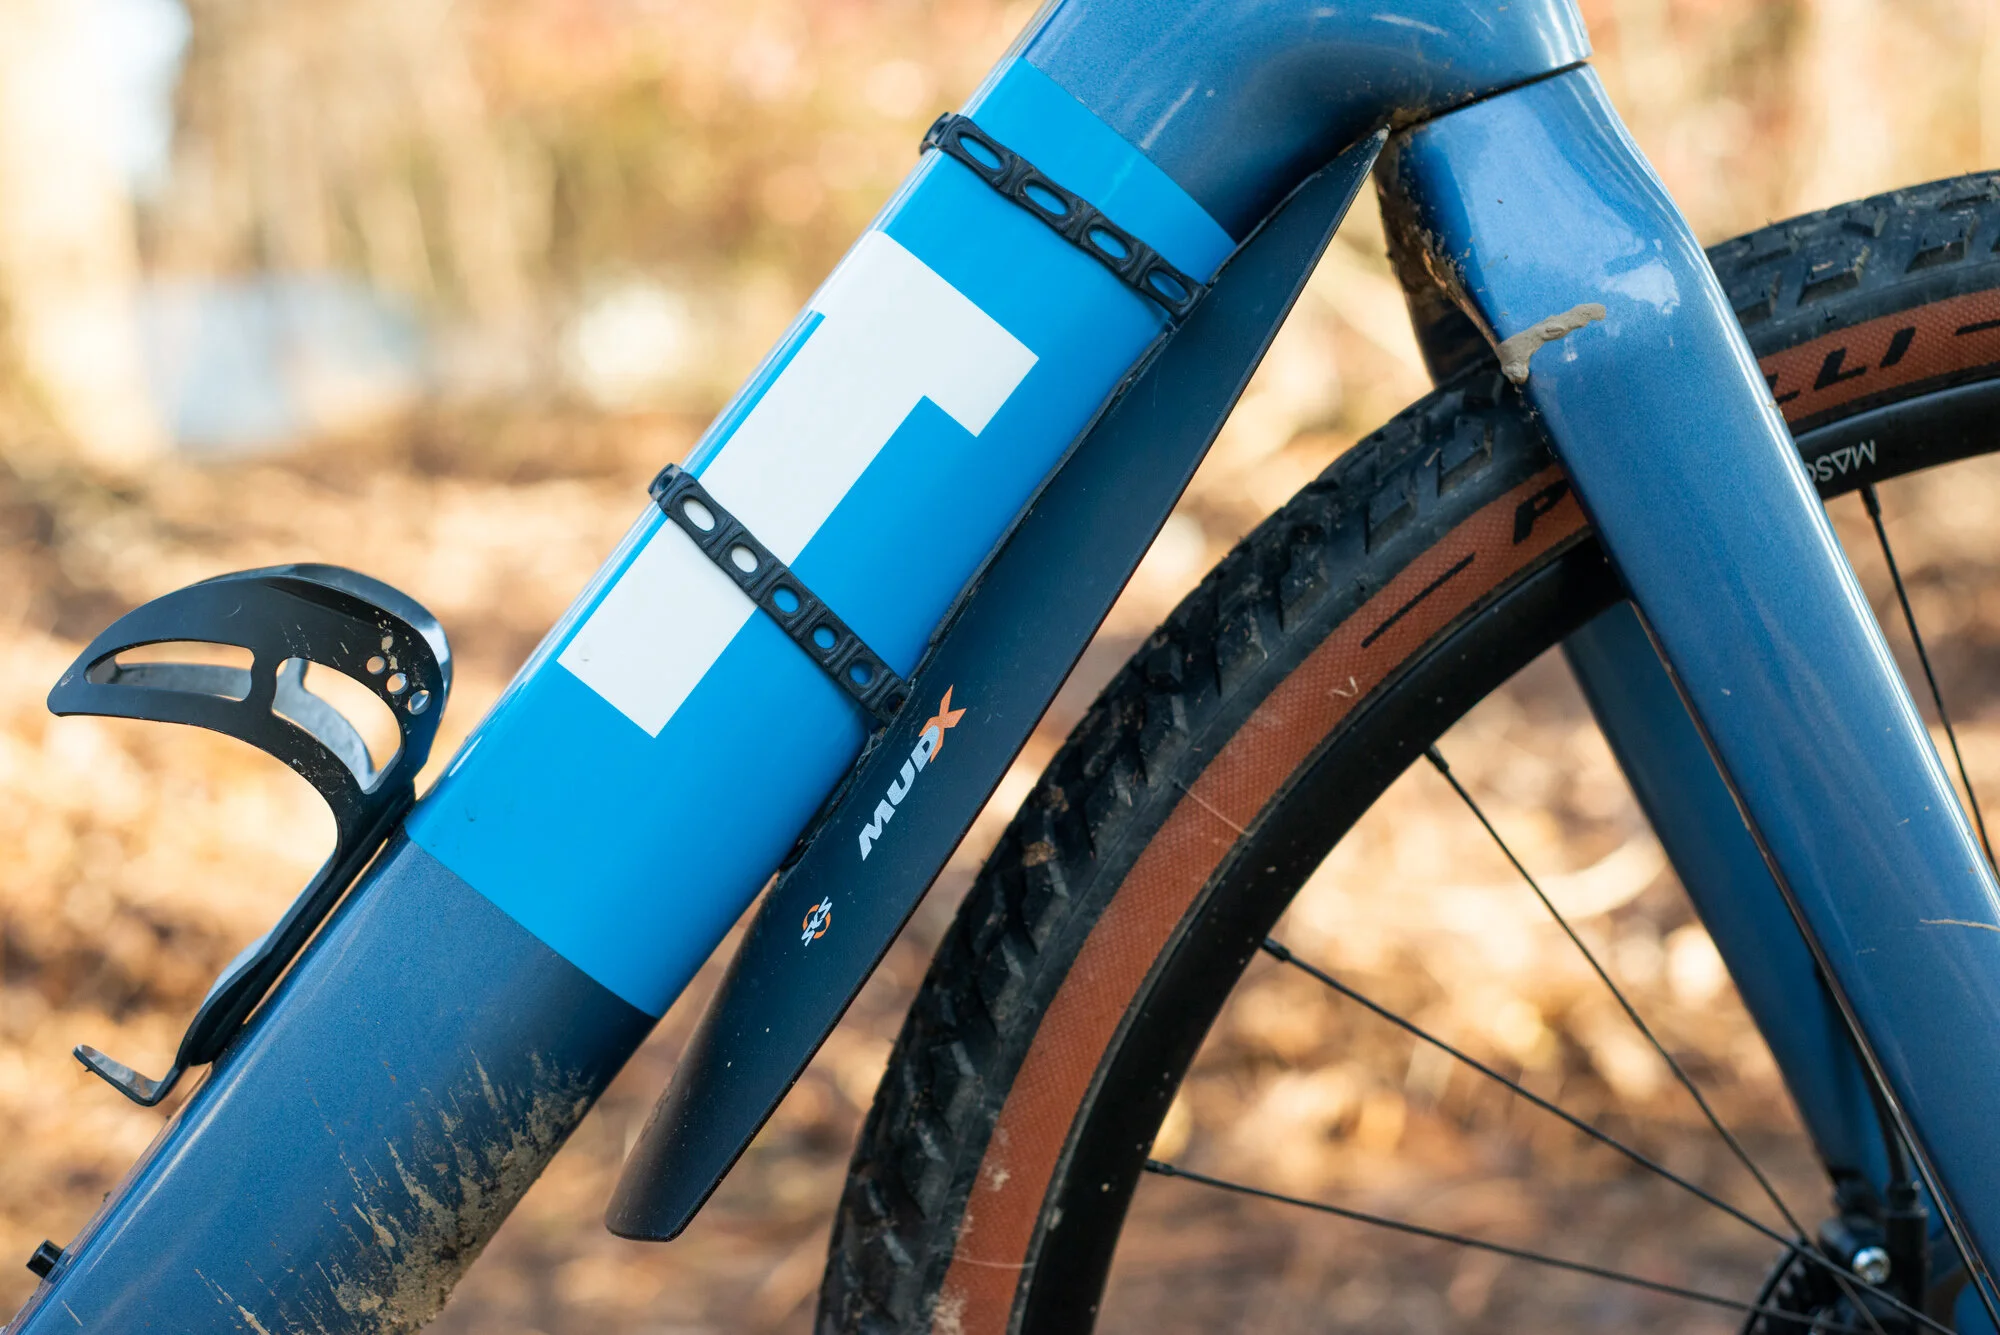
The downtube of my 3T Exploro is so oversized that it can almost block all of the water/mud coming off the front wheel by itself. I wanted to be extra sure to keep some of the mud away from my legs and decided to help the downtube out by adding a front mounted fender. This one was, once again, a fairly tricky area for which to find a mountable fender, given the size of the downtube. I eventually settled on the SKS Mud-X Downtube Fender.
I wish I had the same high praise for this front fender as I do for the back, but unfortunately the mounting process was a bit more complicated. The rubber straps that wrap around the frame were too short and I had to resort to some modifications to eventually get it secured to the bike. The modifications included trimming off the protruding foot pieces and then gluing some old inner tube to the mounting surface to provide a softer and grippier area that sits against the frame. Although it doesn’t look all that elegant, after my work-arounds, I will say that it actually functions really well to keep some of the excess mud away from my legs. The large shape of the front fender does, however, add more wind resistance to the front-end of the bike, and I’ve decided to restrict the use of the front fender to days when the weather is really bad. On regular winter rides, I might just stick to using only the rear fender, since the fitment process is so much easier.


Winter-Mod #2 – Lights
Since wintertime equals shorter days, you’ll eventually have to rely on some lights to get you safely through a ride. The golden rule for riding in the dark is to see and be seen. While the “see” part of this equation is mostly only a problem during winter, the “be seen” part is actually something that you should consider year-round. I’ve come to realize that since a taillight is such a lightweight and small piece of gear to add to your bike, it’s best to just do every riding with it – even on bright sunny days. After moving to woodsy, hilly Virginia from the flat plateaus of South Africa, I’ve noticed that if riding on a shady, tree-lined road with dark clothing, drivers may struggle to see you, even in broad daylight. That’s why I sought out the brightest taillight I could find, to ensure that it was visible to motorists even during a bright summer day. My rear light of choice is the NiteRider Omega 300 lumens taillight that offers excellent daytime visibility. This thing is bright! Seriously, there is no excuse for cars not to see you when this light is blasting out flashes at full intensity and I’ve definitely felt a much greater peace of mind knowing that I’m more visible on the roads.


An added bonus with this taillight and the SKS X-Blade rear fender that I mentioned earlier, is how well they play together. I can easily fit the light and the fender to the bike in such a way that the light remains protected from spray, but at the same time, the light is exposed and clearly visible. I’m legitimately impressed with the design of the SKS X-Blade fender - they clearly thought of everything!


Taillights that help motorists see you are, of course, only half of the picture during the darker winter rides. If you want to extend your rides well past sunset, then you’ll need to add a powerful headlight to your bike. Gravel roads obviously aren’t perfectly smooth by any stretch of the imagination, which means that a high-quality headlight, capable of producing a large number of lumens, is surely a must.


I’ve had my headlight for years and the technology has definitely improved by leaps and bounds since I made my purchase. That said, the fact that my light is still holding up after more than 9 years of use is clearly testament to how well it’s built. The logic behind the purchase at the time was very similar to the rear light – brighter is better! I own the Magicshine 1400 lumens headlight that still featured a massive external battery pack. This model is no longer in production, but the upgraded Magicshine Monteer 6500 Zeus Mountain Bike Headlight or Magicshine Monteer 5000S Storm MTB Headlight now come with an impressive 6500 or 5000 lumens of power. I can’t imagine how bright those lights must be since the 1400 lumen version that own can easily lead cars to flash their lights at you when running them at full power. The quality of the Magicshine products is second to none, and when the day comes that my trusty light decides to quit, I’ll be sure to replace it with another Magicshine product. They offer such a wide selection of lights that it’s definitely worth checking out their range to see what’s available.


Winter-Mod #3 – Additional Tire Grip
The last winter upgrade on my list relates to adding some additional tire grip to be better prepared for more challenging riding conditions. This will come down to where you plan on riding throughout the wintertime.
If you plan on sticking mostly to (wet) paved roads, then tires that offer additional traction on the road might be a good bet. Be sure to check out the Panaracer GravelKing slick tires for that purpose. Don’t let the “slick” name fool you, since these tires offer a good amount of texture on the tire surface that make it better suited for winter riding. I’ve been running the 700x26C version of this tire on my road bike for the last year and have been super impressed with how well it’s performed, both in dry and wet conditions. You can find my full, detailed review of that particular tire here.


If your intent is to skip out on the paved roads entirely this winter and instead stick to the back-dirt roads or trails, then you might have to step up your tire-grip game. Once the weather turns really bad and you encounter some ice and/or snow on the ground, you’ll want to have as much traction as possible. I plan on riding some of the gravel trails in a nearby park for as long as possible throughout the winter and during this time I’m sure to face the 15+% gradient hills while they are covered in snow. To ensure that I’m best prepared for this scenario, I’ve recently switched up my wheelset from the 700c to 650b size on my gravel bike and added some impressively wide and grippy tires.


The 3T Exploro allows for tire clearance of up to 55mm when fitted with a 650b wheelset. This feature was a major selling point, since it provides incredible options for where (and when) the bike can be ridden. Along with the new wheelset, I decided to push out the tire width and opted to fit the Pirrelli Cinturato 50x650b Gravel M tires to my bike. That’s a massive 50mm of incredible tire grip that I now have beneath me on the trails. Not only is the surface area big, but the tire thread on this tire does a phenomenal job at providing grip. The mud-shedding capabilities of these tires are also really well suited for the messy trails that I frequently encounter along my rides. I’m still in the testing phase for both the wheels and the tires, but thus far, I’ve been really impressed with the Pirelli tires and how well they’ve performed. Be sure to stay tuned to this blog for a future in-depth review of both the Mason x Hunt 650b wheelset and the Pirelli Cinturato Gravel M tires.
Wrap-up:
Wintertime doesn’t have to mean endless indoor hibernation. With the correct gear, you can actually be prepared for just about anything. Slap on a set of fenders, a few lights and the correct tires and you’re good to go. Besides, you’ll definitely feel that extra sense of accomplishment when you sit down and scroll through Strava, only to see that most of your friends wimped out and rode indoors, while you braved the wild outdoors. Maybe this winter is the perfect time to forget about all the power targets and FTP tests and just go out and explore new places by bike. Trust me, you’ll reawaken that inner kid who only just learned how to ride a bike and once again tap into that pure joy of freedom and adventure by bike. Happy (outdoor) winter riding!
Tell us in the comments below - what’s your favorite piece of winter riding gear?
-Wiehan