Zwift Running Setup - Affordable, No Sensors Required! (Treadmill Smart Speed App)
Disclaimer: This post contains affiliate links, through which we earn a commission.
The virtual training application Zwift has truly taken off in a big way, especially over the last few weeks as people from all over the world have been restricted from training outdoors due to the global pandemic. Zwift is primarily known for cycling, but there is also a very loyal community of runners making use of the platform to get their indoor running miles completed. I’ve been running on the Zwift application from the very beginning, even in the early days when running was still in the beta phase and only accessible through a secret easter egg in the game reachable only by tapping on the home screen in a specific way. Things have changed a great deal since those early days and Zwift running is now truly a worthy part of the gaming platform. Throughout my time of running on Zwift, I’ve experienced a few frustrations with the speed accuracy and the devices required to capture running speed. That was until I discovered a very simple solution to this problem. In this post I’ll walk you through the Treadmill Smart Speed app and how it can help you to get up and running (you knew that pun was coming) on Zwift in no time.
No sensors required
If you have a treadmill, iPhone and another device that can run the Zwift application (iPad/Apple TV), then you are all set to get going - no additional sensors required! Yep, no foot pods or other running speed devices are necessary for this very basic and straightforward set-up. The Treadmill Smart Speed (TSS) app is a brilliant solution to a common issue when you want to get started with running on Zwift, i.e. how to transmit your run speed. Most people who have a treadmill stuck somewhere in the back of a basement or spare room don’t have all the additional smart technology (like foot pods) laying around to turn that treadmill into something they can use with Zwift. Enter the TSS app!
The app offers three ways for you to capture your run speed and broadcast this to Zwift in order to move your avatar in the game. Your first option is to manually set a fixed speed that the TSS app will broadcast, the second option requires the use of the iPhone’s accelerometers and an armband, whereas the third option relies on an Apple watch to capture your moving speed and then that data gets sent to the Zwift app. Since I don’t own an Apple watch, I can only test and report on the first two options, which is what I’ll do in this post. Let’s dig through the two options that I have access to and see how easy it is to get going.

To start off, head over to the App Store and download the Treadmill Smart Speed app. It only costs $1.99 and once you see all the features in action, you will understand why I think that this price tag is a complete bargain for what you get. When you first open the app, you will be presented with a screen like the one below, however if an Apple Watch is paired to your iPhone, there will also be a third option listed on this menu screen.

1) Manually setting the speed (Treadmill Mode)
If you are reading this title and think that it sounds like way too much effort, then do keep reading. The manual mode of the app is actually the best part and comes with some great features. When it comes to having complete control over matching up your treadmill’s speed to your running speed in Zwift, you don’t get anything better than this manual mode.
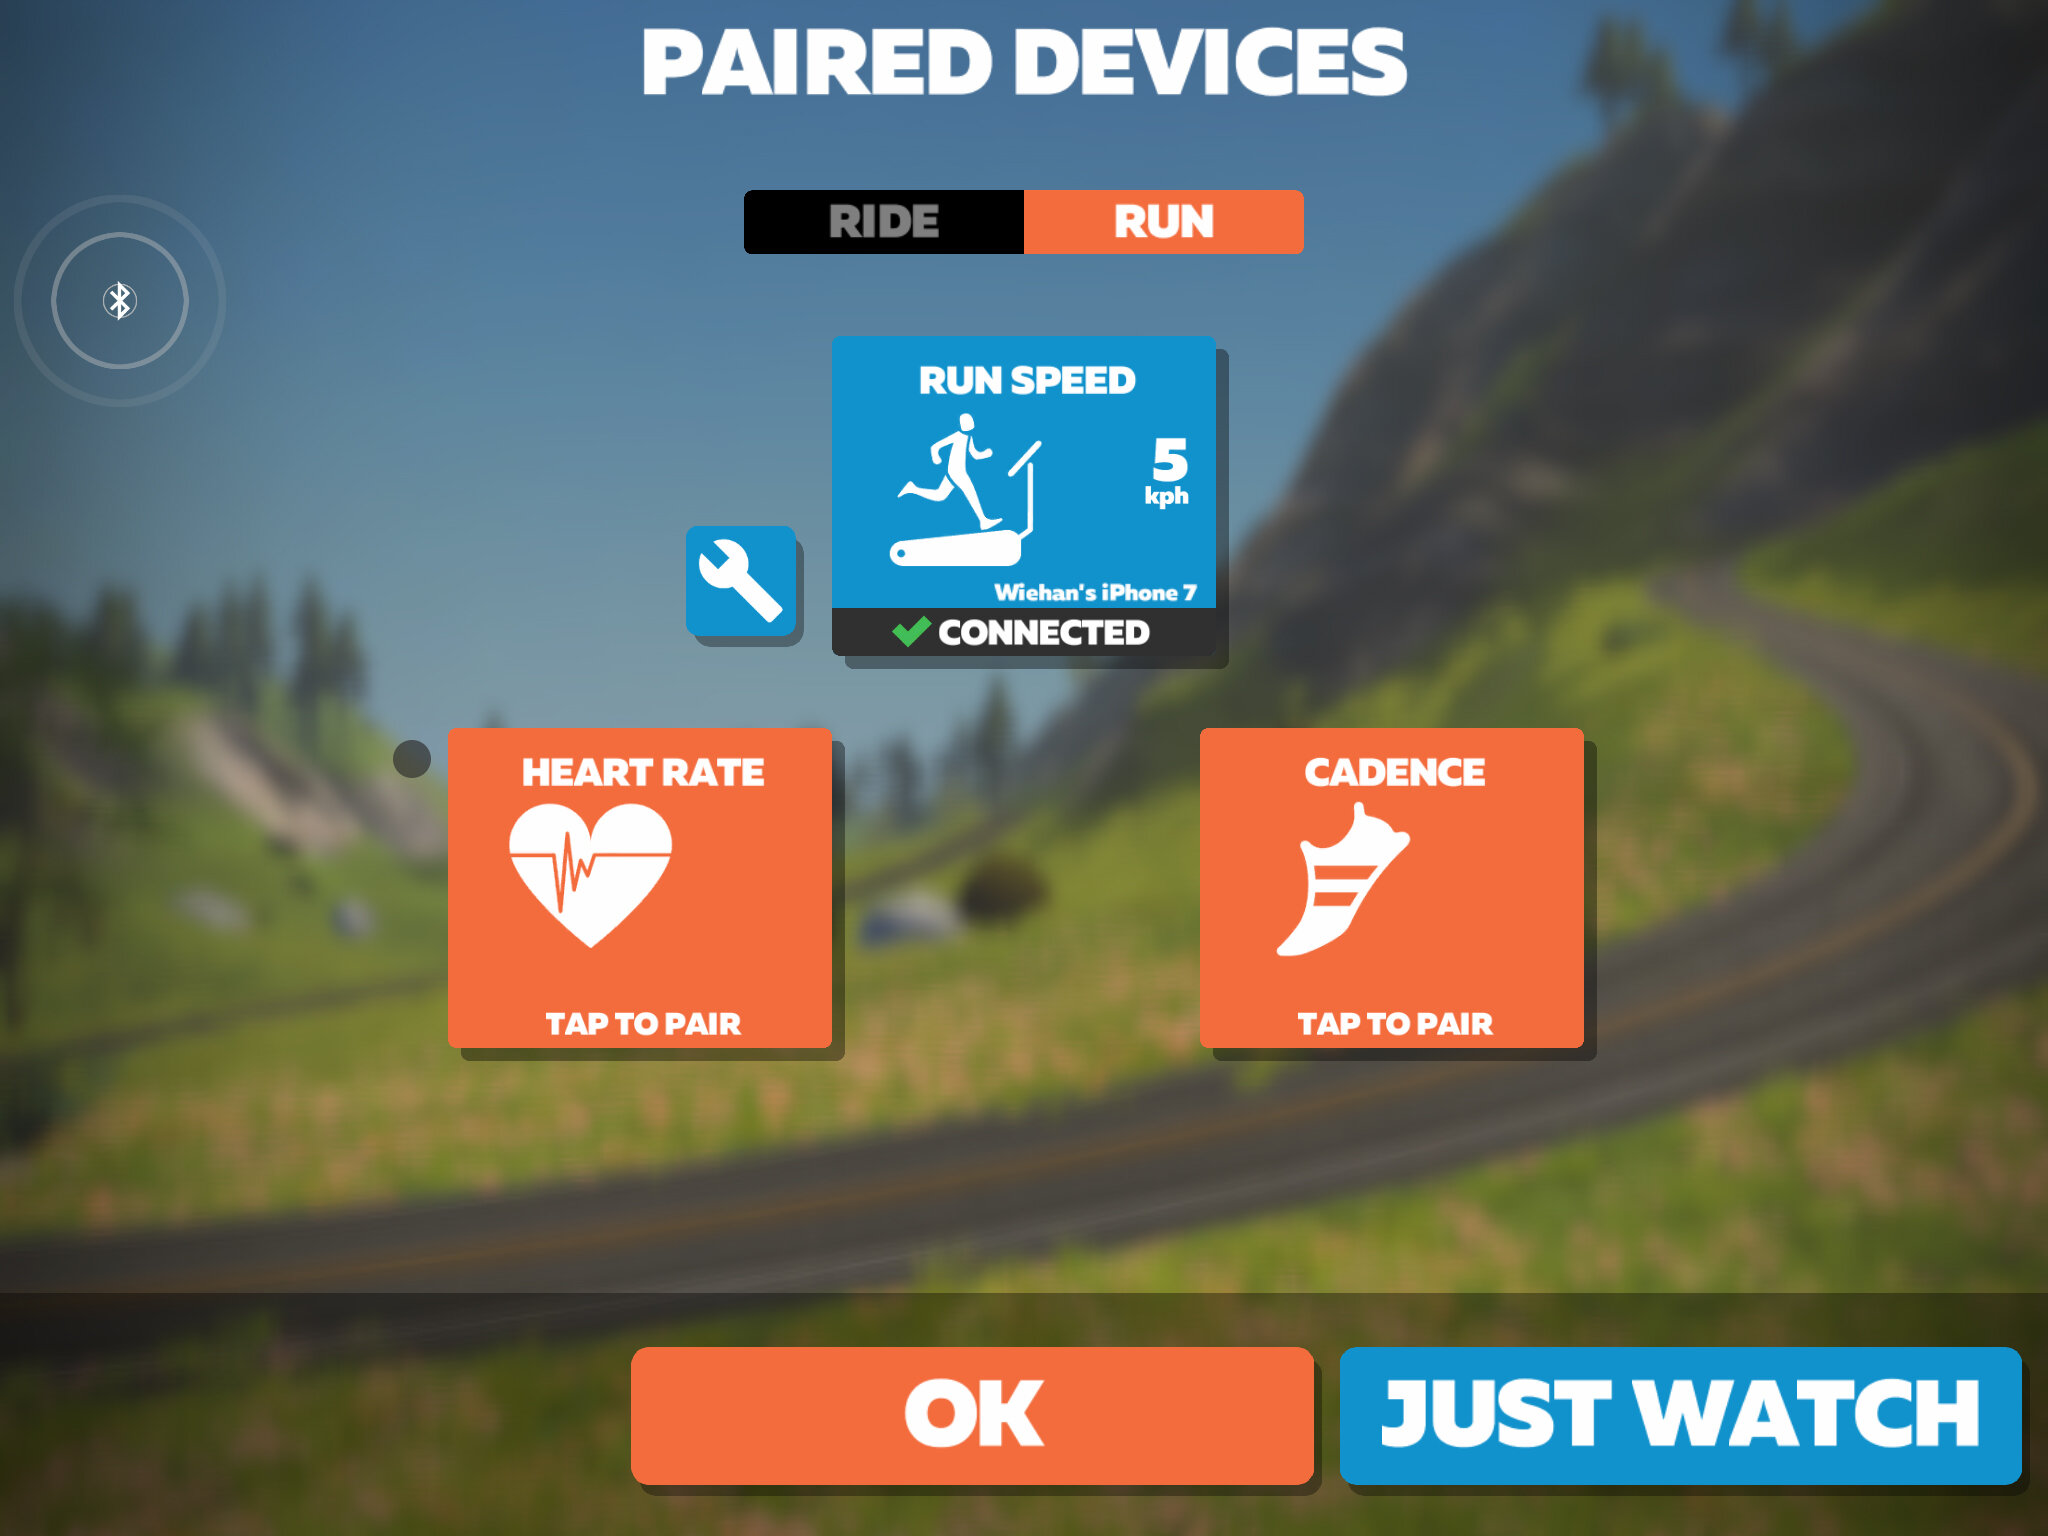
Here’s how it works. As can be seen from the screenshot below, you have 6 speed options from which to choose (I’ll explain how to pick custom speeds a bit later). When you first open up the Manual/Treadmill mode on the app, also open up your pairing screen on Zwift and select your iPhone as the speed source. You can see from my pairing screens below how the TSS app broadcasts my selected running speed through to Zwift and then works as my speed source in the game.
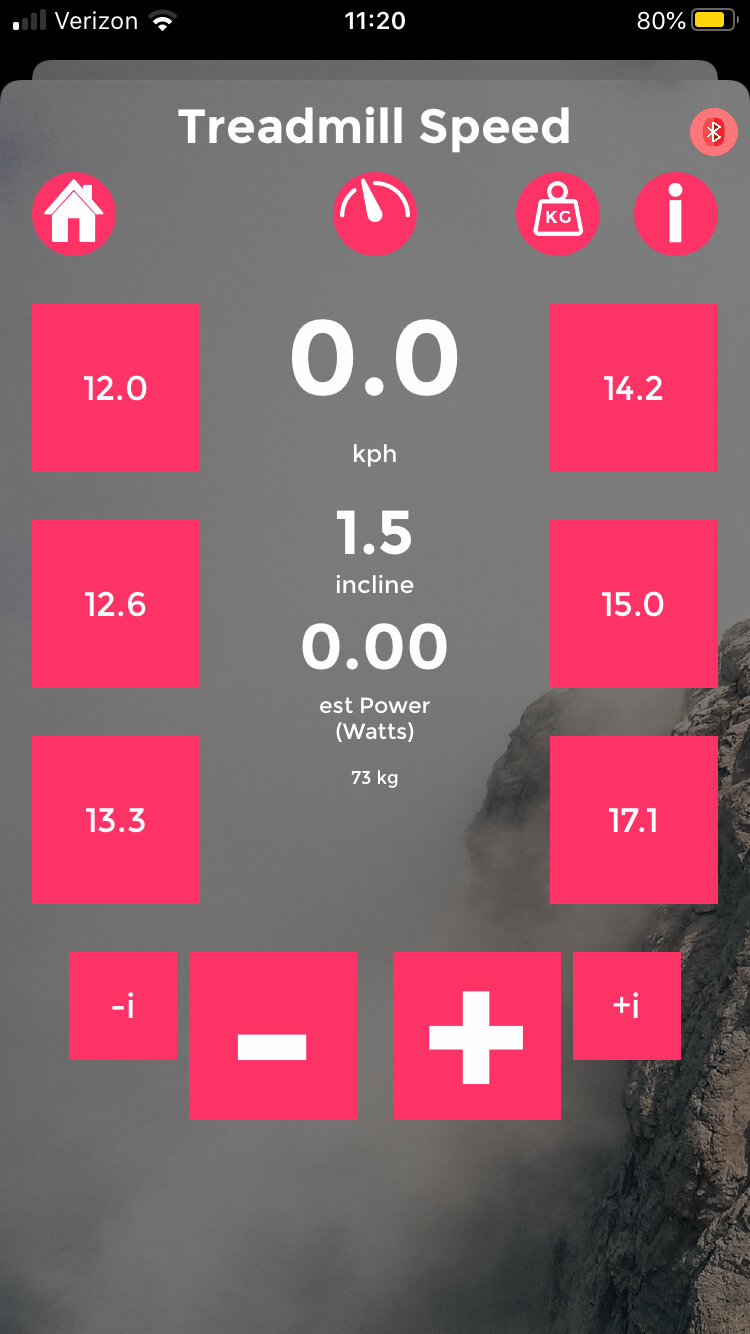

As you tap on each of the different speed boxes (6 options), that particular speed will be transmitted to Zwift and will move your avatar at that exact fixed speed. It’s as easy as that! So what’s the catch? Well, for you to have a realistic experience, you need to match your treadmill speed (as displayed on your treadmill’s console) to the speed that you are sending to Zwift. Of course, you can cheat the system and run at say 10km/h on the treadmill, but use the app to send 15km/h to Zwift. That’s just cheating yourself, and you really aren’t helping anyone by doing so. If you want to have a realistic workout that is based on fair numbers, then just be as accurate as possible in matching your treadmill speed with what you have selected on the app. You can also dial up or down your running speed in 0.1 increments by making use of the plus and minus sign buttons to really fine tune the speed at which you want to run.
If you don’t like the speed selections that the app provide as defaults then fear not. It is also possible to change the 6 options to whatever speed you want. Simply tap on the small speed dial icon in the top-middle part of the screen. You can then tap on any of the 6 boxes and use the adjuster to select the speed you would like to program to that control.

My pro tip is to make one of your boxes a stopping speed (0km/h). This means that you can push that button and have your avatar come to an immediate stop in the game. You can see my preferred speed selections in the screenshot below. I have one selection dedicated to a walking pace (4.8km/h) and the rest of my selections are based on particular running zones that I like to use; 12km/h (05:00min/km) as an easy pace, 13.3km/h (4:30min/km) as a steady pace, 15.0km/h (4:00min/km) as a tempo pace and lastly 17.1km/h (3:30min/km) as my fast pace. You can get as creative as you’d like with these settings.

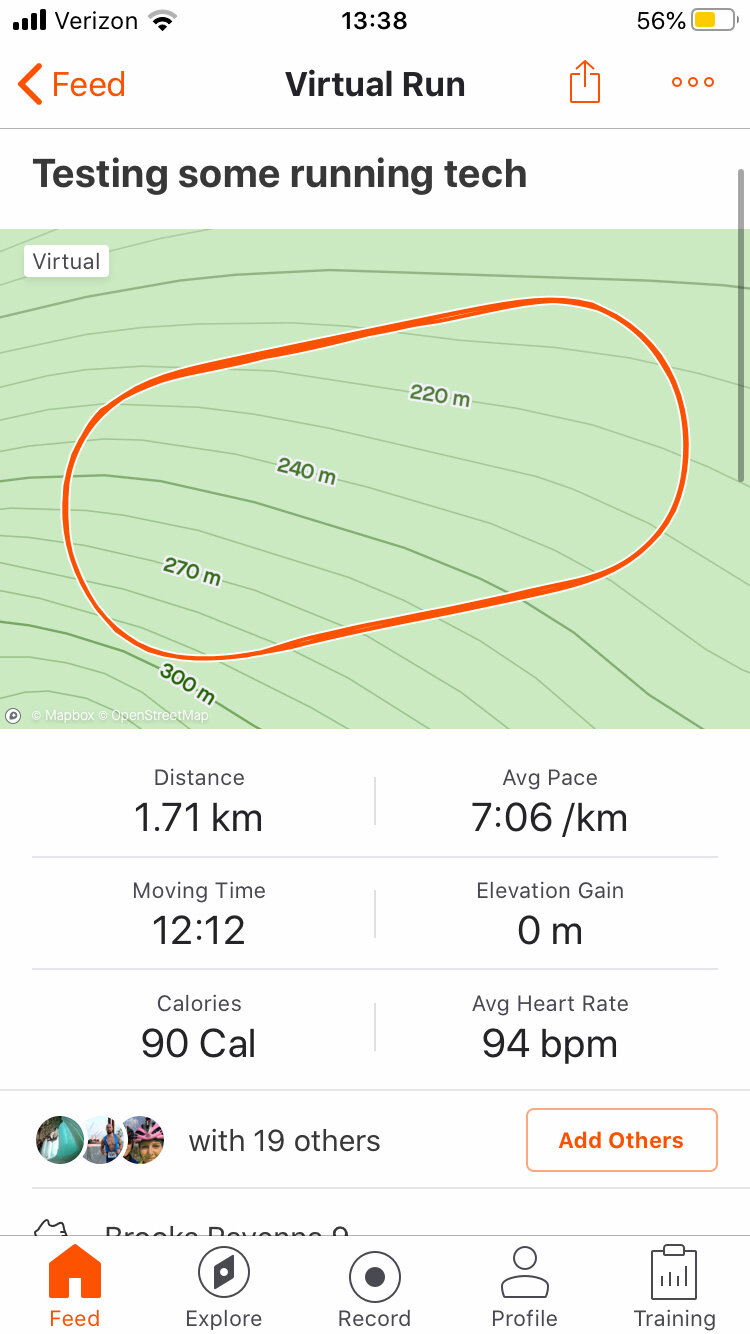
There is also an additional bonus to the manual mode, and this comes in the form of incline capture. You can gather from the screenshots shown earlier that you have the option to enter the incline manually. Why is this important? Zwift running, as great as it is, is still not fully mature and some measurements such as elevation gain do not register through the Zwift app. This is for good reason, because most of us when running indoors don’t bother to adjust the incline of the treadmill. If you’ve been taught well, then you know to simply stick the treadmill incline to 1% (for flats), and away you go. It will make no sense for Zwift to report the elevation you accumulate in the virtual world and then save this data to Strava, because in reality you only ran on a flat treadmill setting. That’s where the manual incline input you provide to the TSS app becomes super useful. You can set the incline number up or down and this data is then saved to your Zwift file that gets uploaded to Strava. Take a look at the two Strava screenshots below. During the first activity, I had the incline set to 0% within the TSS app, while in the second activity the incline setting was changed to 1.5%. Note that I have elevation gain in the second one, but not the first. Great extra feature if you ask me!
2) Running using an iPhone armband
The second way you can make use of this app to run on Zwift is with the use of an armband that straps an iPhone to your arm. This method relies on the built-in accelerometers of the phone to capture your movement and will then transmit the speed to Zwift. This method certainly comes with a convenience factor. You simply have to strap your iPhone to your arm, and off you go. No need to worry about pressing any buttons during your run to match up the app speed to the treadmill speed. This is unfortunately where the good news with this method ends. In testing the speed-readings that I obtained from the iPhone + armband combination, the numbers were fairly inconsistent and pretty far off from the speed that my treadmill showed. I suspect that the app developer has been running (these run puns just keep on coming) into the same problems with inaccurate readings, since even the app notes on the App Store display how this particular method of capturing speed will be discontinued in the future and users should instead opt to make use of the manual/treadmill mode or use the Apple watch mode instead.

3) Running with a paired Apple Watch
As mentioned earlier, I do not own an Apple watch and wish I could have provided a breakdown of how that particular part of the app performs. However, when looking at the notes from the developer again you can see that the personal recommendation from them suggests that the manual/treadmill mode might be the best option. I completely agree and think the manual mode is such a simple solution to get treadmill speeds reported into the Zwift game, and anyone looking for a quick start with Zwift running need to look no further. This is not to say that the app is absolutely flawless, and I’ll dive into some deeper details in the next section.
Let’s get into the details
There are some gotchas to be aware of when you are using the TSS app to run on Zwift. In this section I’ll dive into the weeds and get a bit nerdy about how this app compares on the accuracy ground. Whenever you are using the manual mode, you are making one fairly bold assumption - that your treadmill speed is accurate. This is most definitely not the case for everyone, since treadmill speeds are well-known to be fairly inaccurate. Let’s say you are using the app to broadcast 12km/h to Zwift, and you match your treadmill to that speed, then you are essentially relying on the fact that you are actually running at the 12km/h stated on the treadmill’s console. This is where most of you will just write off the TSS app as a big waste of time and look for an alternative option. I’d like to argue that almost all of the other sensors that people use to run on Zwift actually suffer from this very same flaw. If you are an experienced Zwift runner reading this, then hear me out about why I think that even those of you using a well calibrated foot pod fall victim to this same shortcoming.

Seasoned Zwift runners who use a foot pod (something like the Polar foot pod or Zwift Running pod) to run on Zwift will know that calibrating the device is a must to get anywhere close to an accurate reading. Zwift has a neat built-in tool (as shown in the screenshot above) that allows you to calibrate your foot pod by having you run at three different paces to determine how Zwift should read that type of running speed. To understand my argument, you need to pause for a second and consider what actually happens during this calibration. You are setting your treadmill at a particular pace and telling Zwift that the reading that it receives from the foot pod should actually be the same as what your treadmill is displaying. To state it differently, you are relying on the treadmill as the golden data source and instructing the Zwift application to match foot strides from the foot pod to that particular speed. How is this any different to the manual mode of the TSS app where you simply match the speed of your treadmill and your avatar’s speed manually? That’s just some food for thought to those Zwift runners who will question this method of capturing the run speed.
My last note about the accuracy goes back to the incline setting that can be adjusted manually. What I didn’t address in that particular section were the estimated power number that the app will give you. This is, of course, simply based on a mathematical equation that factors in your running speed and also the incline that you specified. How does this estimate compare to other data sources? Well, I put it to the test using my Garmin Fenix 5 and the Garmin Running Dynamics Pod. By using the Running Dynamics Pod, I can display running power on my Garmin watch as a separate data screen. My tests showed that the Garmin power readings were considerably higher than the estimates provided by the app. In some way this is not surprising as Garmin running power readings have been known to be on the higher end when compared to something like the Stryd running foot pod. The measurement of running power unfortunately has too many variables and to make judgements about accuracy is not all that straightforward.
Wrap-up:
The Treadmill Smart Speed app is an excellent option for anyone who does not want to mess around with additional running sensors and wants to get going with Zwift running as soon as possible. This super affordable option obviates the need to buy an additional smart sensor just to broadcast your running speed to Zwift. There are certainly some drawbacks to this set-up and relying on the accuracy of the treadmill’s speed is most definitely the biggest shortcoming. The need to consistently change both the app and treadmill speed throughout the run also gets annoying, but at the end of the day, it’s a small inconvenience to go through when in return you get to make indoor running that much more fun. I am all for making Zwift running more accessible to a larger audience and this app has the ability do exactly that. I’ll most definitely be recommending this app to some of my closest family and friends who own treadmills, but aren’t currently running on Zwift.
Let us know in the comments below if you have tried out this app and what some of your initial experiences have been.
-Wiehan