Take Your RideWithGPS or Strava Routes to the Next Level
Disclaimer: This post contains affiliate links, through which we earn a commission.
If a picture is worth a thousand words, then a 3D rendering must surely be worth a whole lot more. When it comes to cycling route planning, a birds-eye view of a map or an elevation profile only paints half the picture. Sometimes, to be fully prepared for your next exploration ride, you’ll need to go one step further and study your cycling maps in a completely different way, using a professional level tool – Google Earth Pro. In this post (and the associated video tutorial) I’ll walk you through the workflow of how to import a Strava or RideWithGPS file into Google Earth and then show you how to inspect your routes like never before. Let’s get started!
The Need for More Info
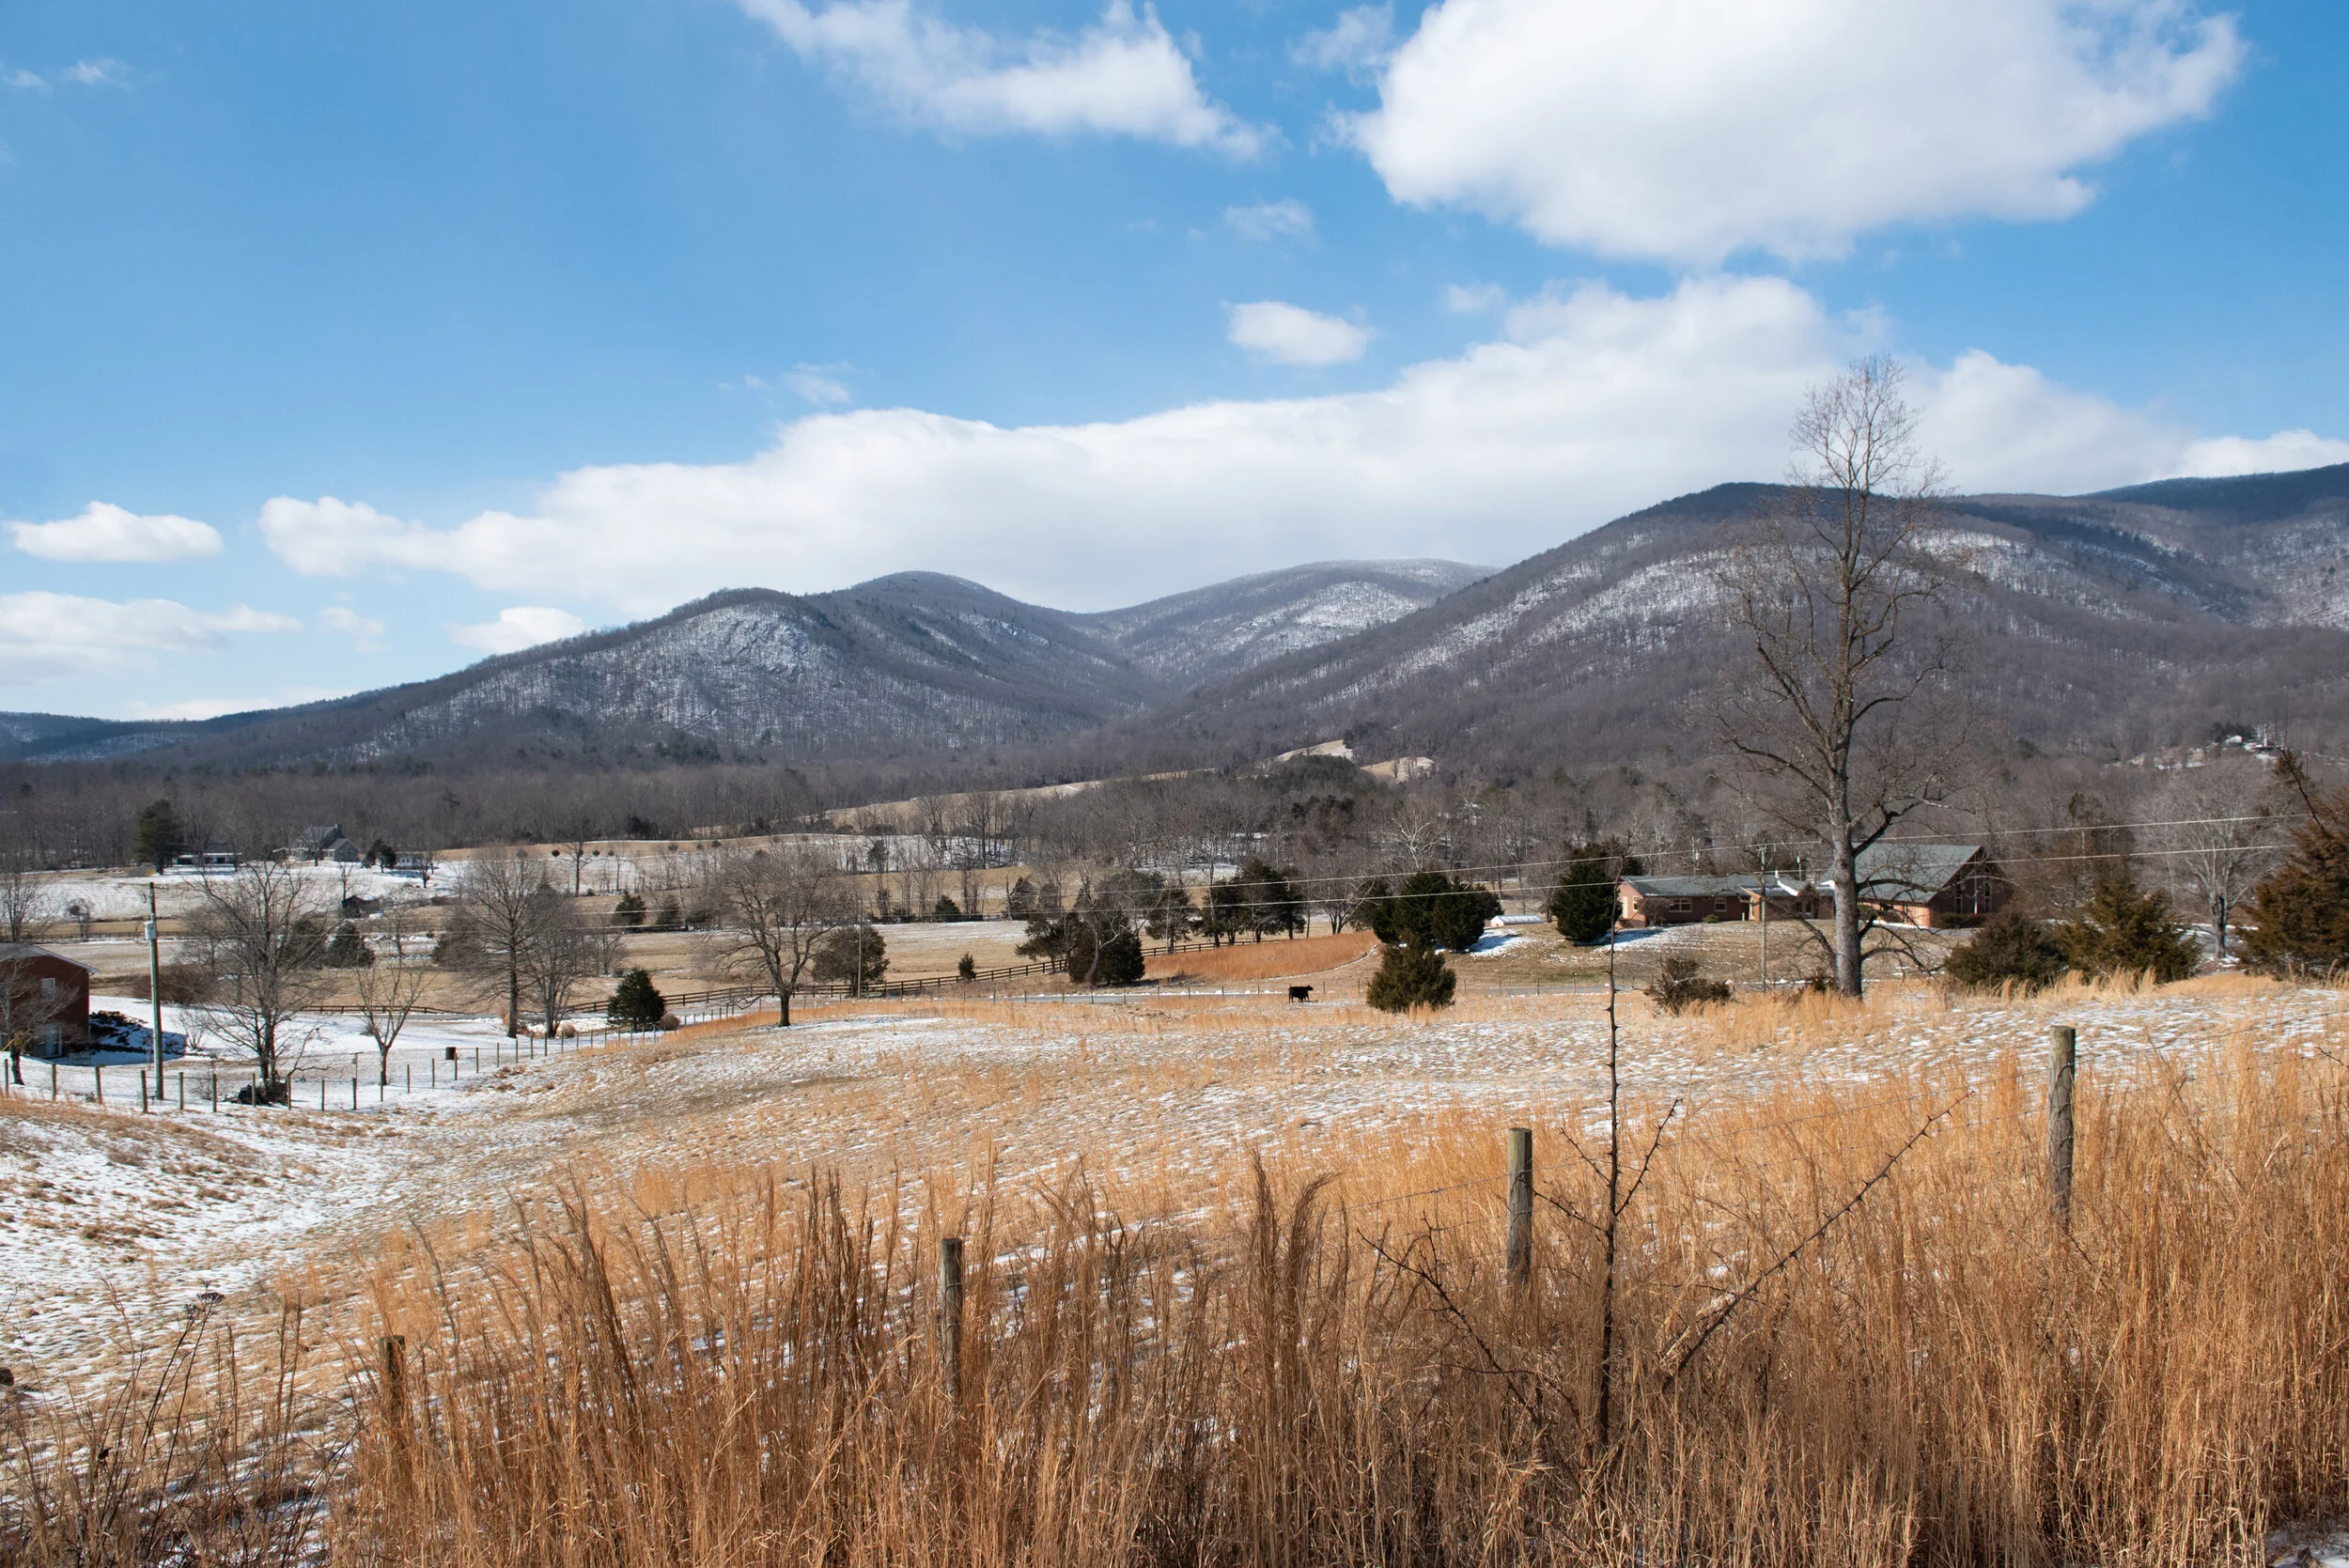
Over the last few months, I’ve embarked on a few truly unforgettable bike rides that took me into some completely unknown territories. I ventured into places that I knew nothing about and had to research as best as possible before I set off on my rides. Two recent Gravel Ride of the Week routes fall into this category: Gravelocity and Pantani XV. The routes for both of these rides included some epic climbs that took me high up into the Blueridge and Shenandoah Mountains in Virginia. I’ll be honest - I felt a bit intimidated by what I might find along these routes when I first looked at the maps. However, loading up on as much information about the routes as possible, really helped to settle some of the pre-ride nerves. Knowledge truly is power when it comes to cycling route planning.

Limited view provided by 2D maps
During the research phase, I constantly felt that the simplistic 2D view of an overhead map or the side-on view of an elevation profile just didn’t give me enough information about the terrain. I needed a tool that would allow for more interaction with the landscape in order to obtain an in-depth insight of how the route would unfold. Sure, metrics like overall elevation gain, maximum gradient and the total distance of a climb all help to fill in the picture, but sometimes you want to fully visualize what you’ll be up against. Enter Google Earth Pro!
Google Maps vs Google Earth Pro
I think it’s safe to say that we’ve all interacted with the Google Maps software from time to time, whether to look up an address or plan out driving directions. The overhead satellite view provided by this software furthermore allows for multiple applications, including the ability to scout out where certain roads may lead. Perhaps you’ve even used the “Street View” feature from time to time to inspect road conditions as viewed from ground level. Google Maps is truly an invaluable tool and a must for all cyclists, especially if you like to build your own routes. If you haven’t used the Google Maps features in your route planning yet, then be sure to check out my other post about planning out the perfect gravel route, to see how you can incorporate them when designing a cycling route.


As powerful as Google Maps may be, you can still step up the map functionality when you shift over to the full suite Google Earth Pro software. While Google Maps can be accessed within a browser or on the app, the fully featured Google Earth Pro software is an application that needs to be downloaded and installed on your desktop or laptop computer. Sorry iOS and Andriod users, you’re out of luck when it comes to these pro features. While there is a watered-down Google Earth browser version, the tools that I will demonstrate in this post require the full desktop version of the software. To get started, make sure that you’ve got the application installed and ready for use. You can download the application for free from Google or simply follow this link for quick access.
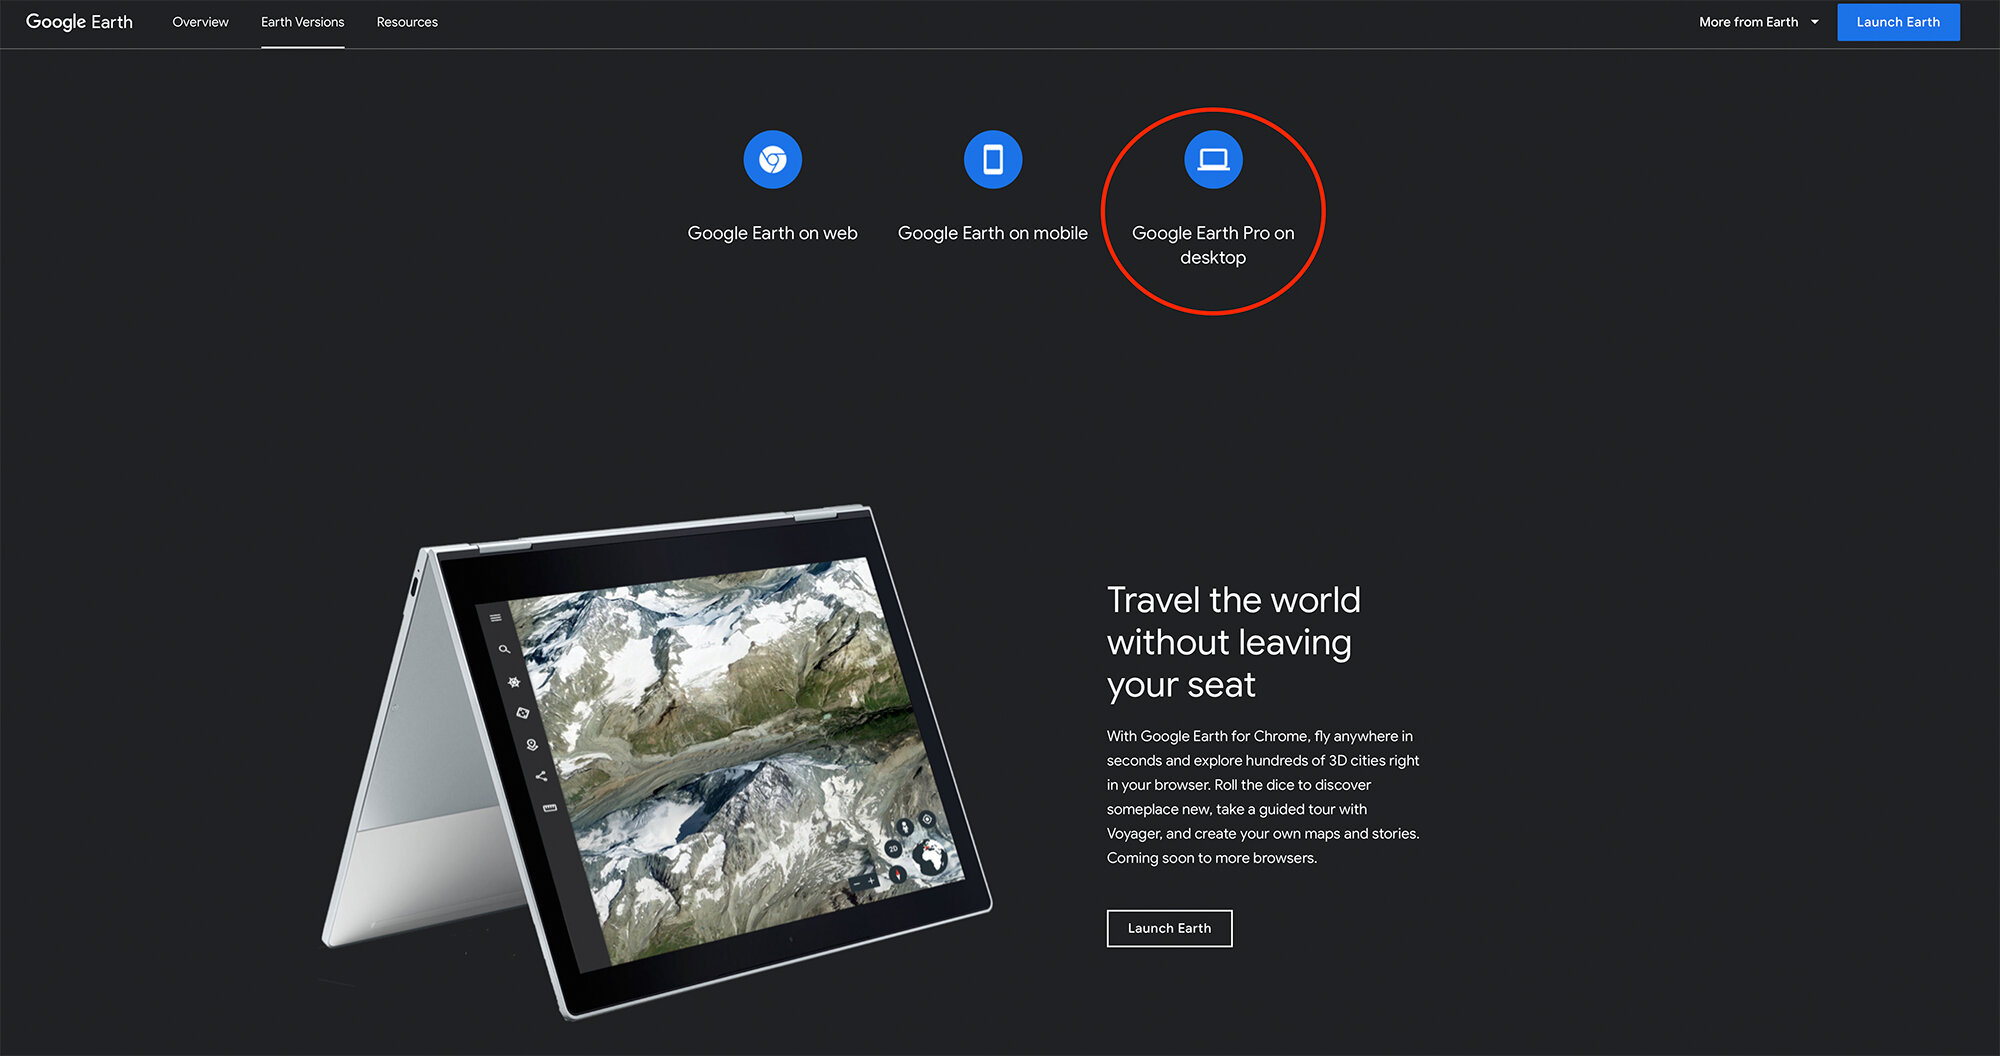
Pro Features Only Available With Desktop Version
Importing Your Cycling Routes to Google Earth Pro
Before you can jump into the Google Earth Pro software, you’ll need to first ensure that your cycling routes are in the correct format for the software. I’m not going to cover the exact process of designing a cycling route from scratch in this post, but be sure to check out my other article about how you can use the Strava Route Builder Tool to design your very own routes. There are also various other methods in which you can obtain a cycling route, be it by downloading the file from a platform like RideWithGPS, or perhaps a race or event organizer has provided you with a link to their course.
Step 1: Regardless of where the route resides, you’ll need to start by downloading the file onto your computer.
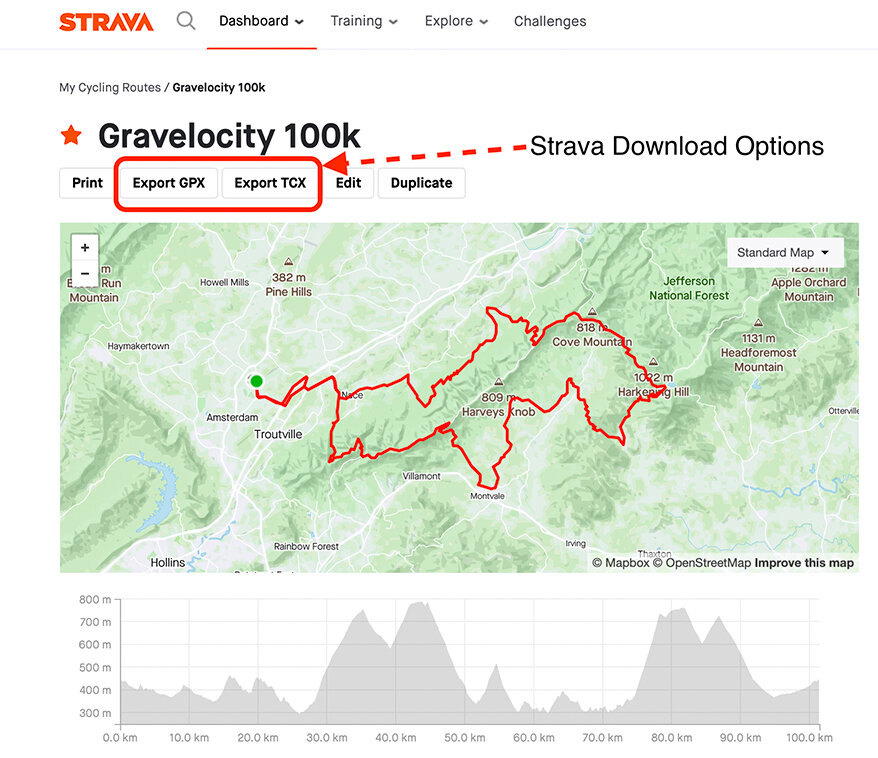
Strava Allows for GPX & TCX Download Only
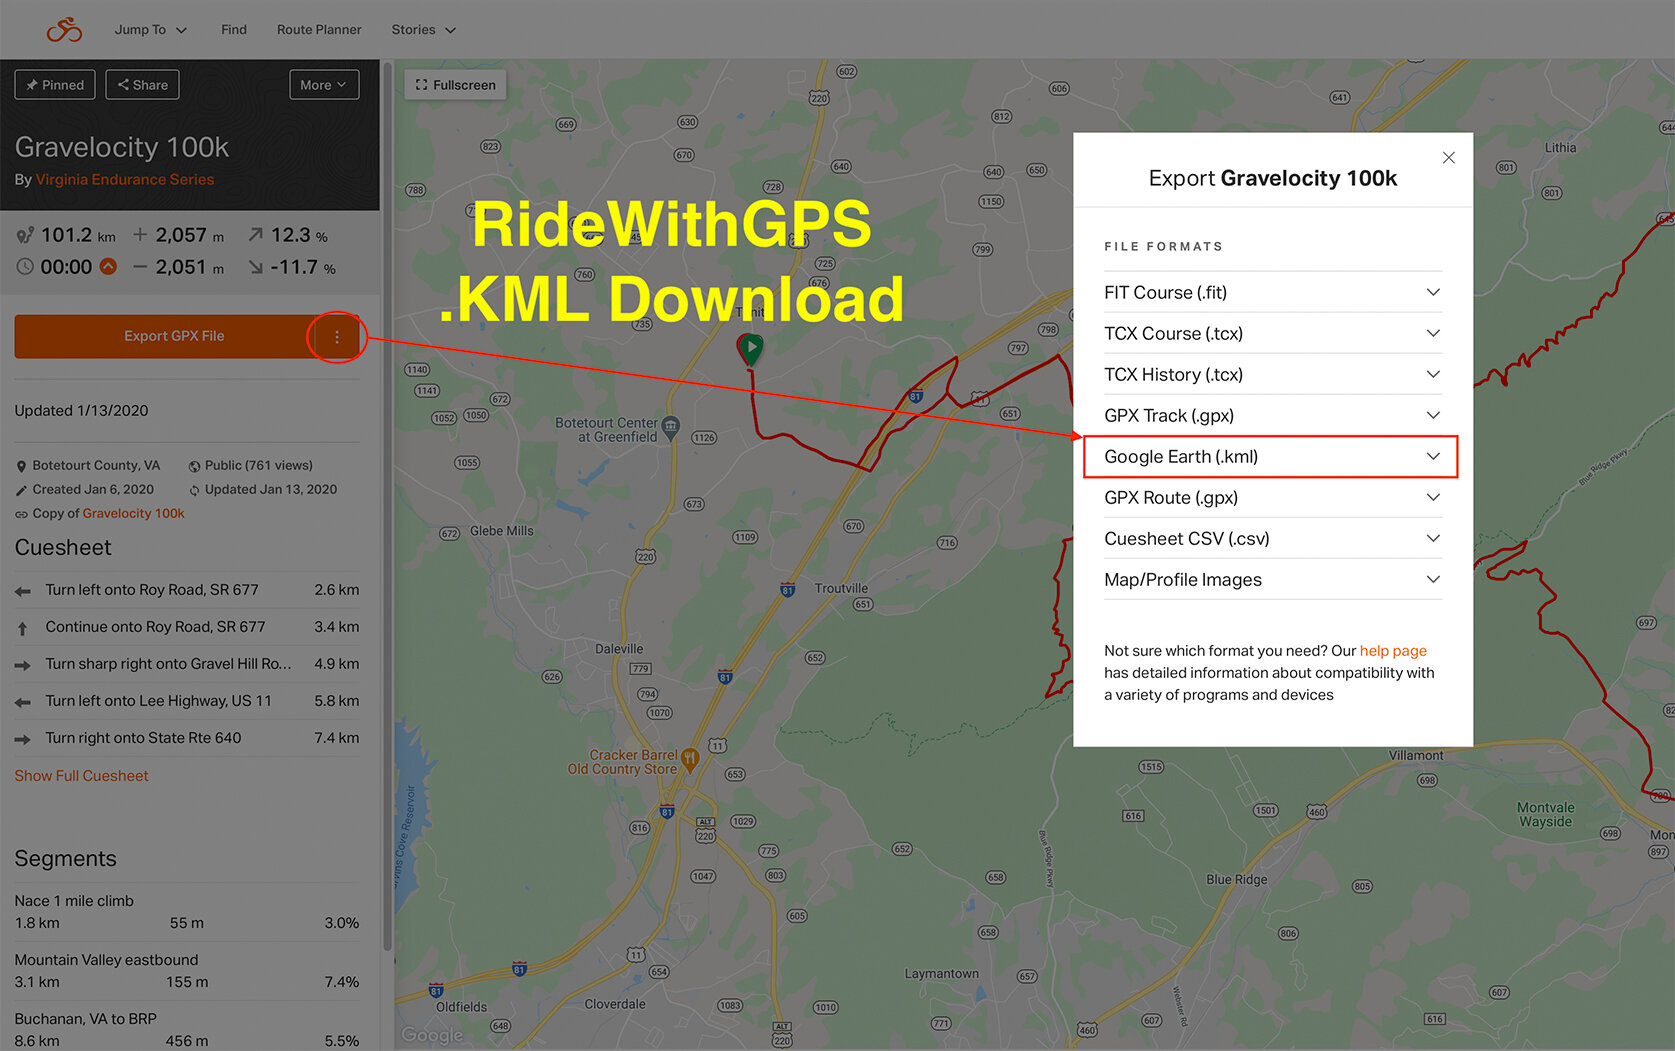
RideWithGPS Offers KML Download Option
Most cycling route planning tools offer the ability to download a route file in a .GPX or .TCX format. These are formats that a Garmin/Wahoo head unit can accept when navigating that particular course. Google Earth Pro in contrast requires a .KML or .KMZ file.
If your route is currently listed on RideWithGPS then you're in luck! They provide the option to download a route in the KML format and you can skip step 2 below. If your route building tool (like Strava), does not allow for .KML download, then my recommendation is to download your route file in the .GPX format. You'll see why in the next step.
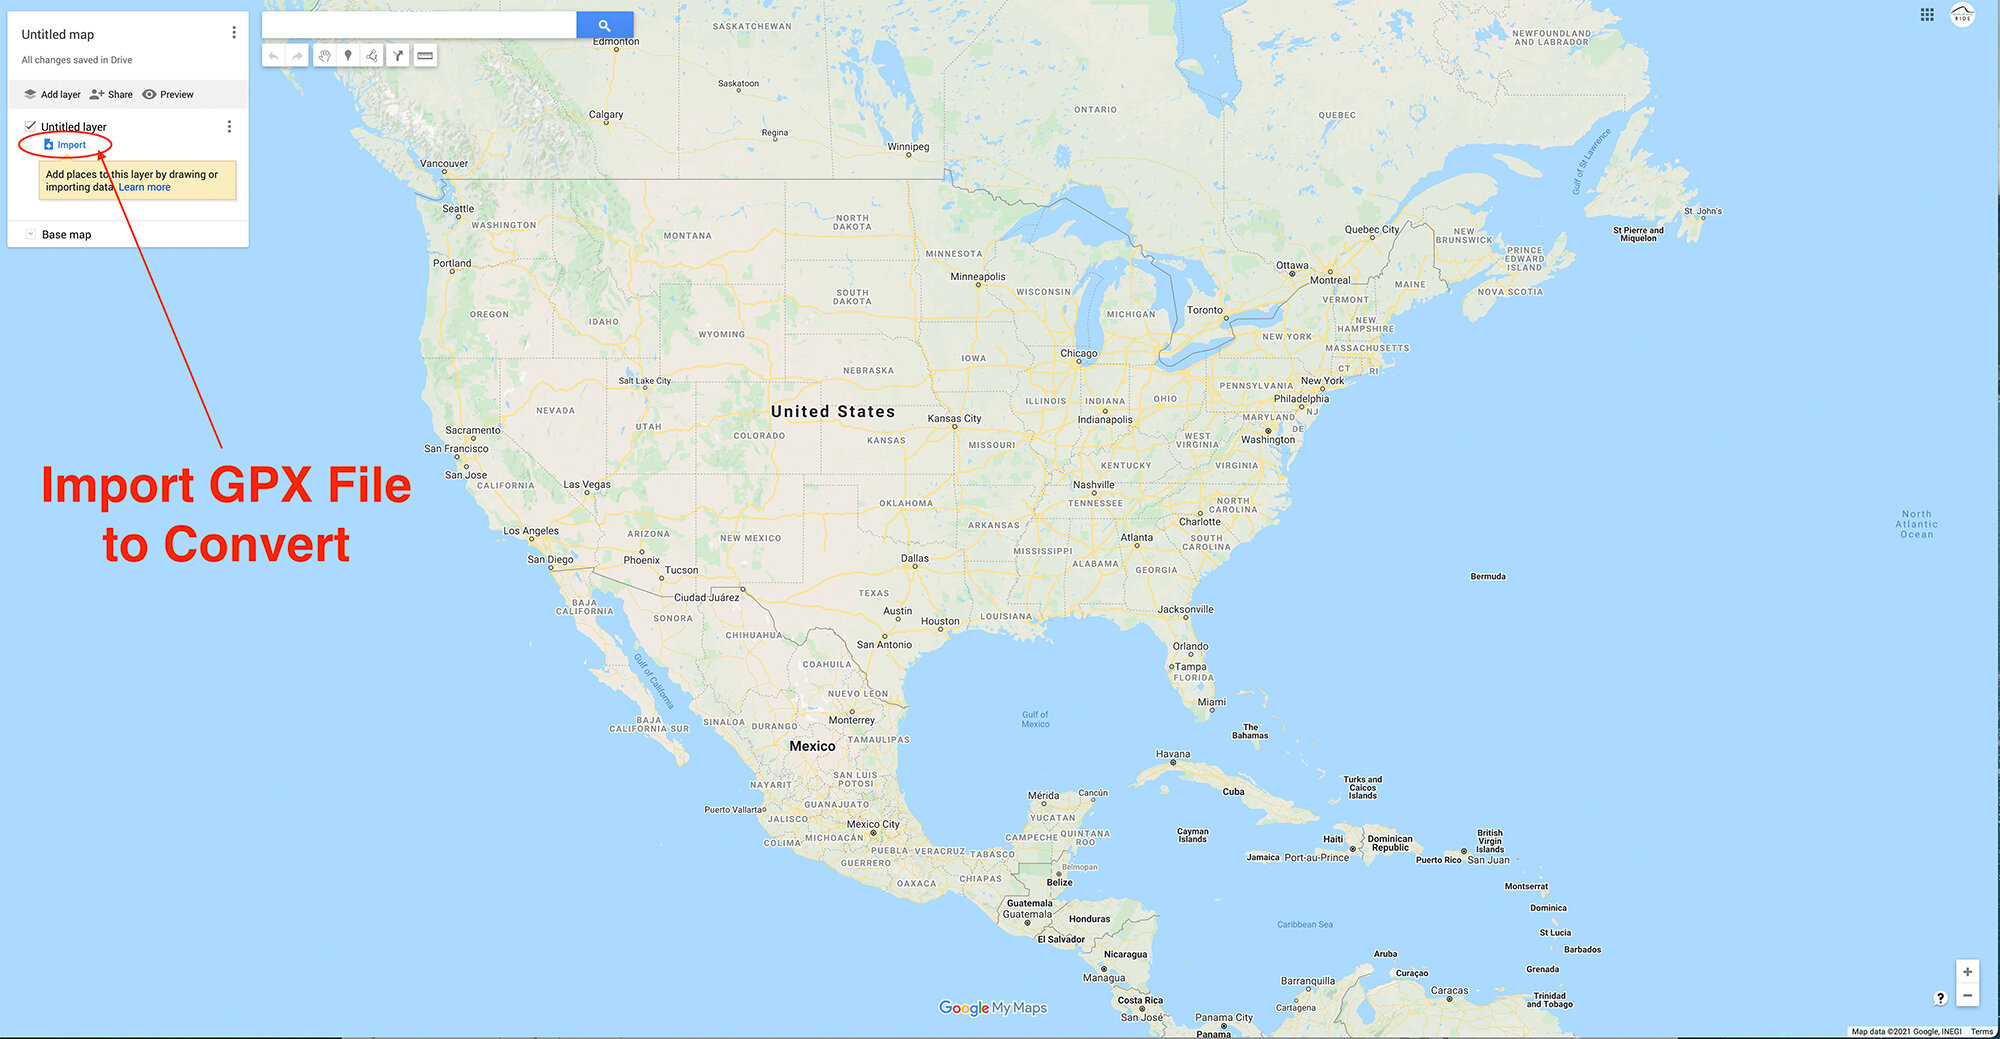
Step 2: Convert your cycling route from GPX to the KML format.
While there are numerous free online converter tools available that can be used to make this conversion, I’ve never truly felt 100% at ease when using them. You never know what kind of dodgy code is running in the background of these website, most of which are littered with pop-up ads. I’ve resorted to keeping things within the Google ecosystem and making use of the “MyMaps” service to convert the route files.
Here’s how it’s done:
Visit www.google.com/mymaps/
Click on the three-line Menu (top left corner)
Select “Create a new map”
Under the Untitled layer, click on "Import"
The Upload Box will allow you to import CVS, XLSX, KML & GPX files
Browse your downloads and selected the .GPX route file that you've downloaded
Click on "Untitled map" to rename your map
Click on the three-dot menu (next to map name)
Select Export to KML/KMZ
Use the drop-down menu and select only your map (not entire map)

You can tell from all the steps that this is no quick process and hence the appeal to use an alternative converter tool. No matter how you ultimately get there, the goal is to have your cycling route downloaded in the .KML file format.
Using Google Earth Pro
We're finally ready to move on to the main star of the show. After launching the Google Earth Pro software, you simply need to select File and Open. Browse to where you've saved the KML file, and it will be imported to the Google Earth software.
You'll see that your route is now listed on the left-side "Places" panel. Note that it's currently saved under "Temporary Places." If you should quit out of Google Earth at this point, you'll lose this import. To save it to the software more permanently, simply drag and drop your route from the Temporary places over to "My Places".

Now for the fun to begin (Yes, I'm a map nerd). With your route map shown on screen, you can begin to interact with your cycling map like never before. There are so many powerful ways to inspect your route, and the best way to get familiar with the software is simply by browsing through all the different menus to see what each will do. There are, however, a few key things to know that can help speed up the process and I'll provide you with my top-tips next.
Tip 1: Mouse navigation is key
If possible, make use of an external mouse to navigate the map. The trackpads that you'll find on laptops just don't work as well. This is mainly due to the lack of a scroll wheel. While there are keyboard shortcuts available to negate the need for a scroll wheel, I've found that having a mouse with the wheel makes the process so much quicker. Here are some of the mouse & keyboard inputs that you need to know:
1. Left click + drag = Move around on the map
2. Right click + drag left/right = Orbits the view around point
3. Right click + drag up/down = Zooms out or into the map
4. Scroll wheel click + drag left/right = Rotate around the point
5. Scroll wheel click + drag up/down = Raises or lowers your point of view
6. Scroll wheel rolling = Zooms out or into the map
7. For a full list of keyboard shortcuts refer to Google's Official Help Guide
The true power of the Google Earth software lies in number 5. Having the ability to drop the point of view lower allows you to take full advantage of the 3D view. The lower vantage point allows for a view of the landscape unlike anything that you will find with other software packages. Position yourself at the base of a climb and you’ll be able to visualize the climb in amazing 3D detail.

Visualize a Climb Like Never Before
Tip 2: Turn on the Elevation Profile
The traditional side-on view of the elevation profile is still available within Google Earth Pro. This won't show up by default, but you can turn it on by doing the following:
1. Select the path track of your route. This is found in the drop-down list that you'll find when you double click on your route's name within the "My Places" panel. The icon is displayed as three colored dots connected by lines.
2. Navigate to Edit and then select "Show Elevation Profile".

Turn on 2D Elevation Profile
Having the Elevation Profile switched on is really handy, since you'll be able to run the cursor over the profile, which will then display a red pointer on the map, indicating the corresponding position on the map. You'll even get distance, elevation and grade stats for that particular point on the map.
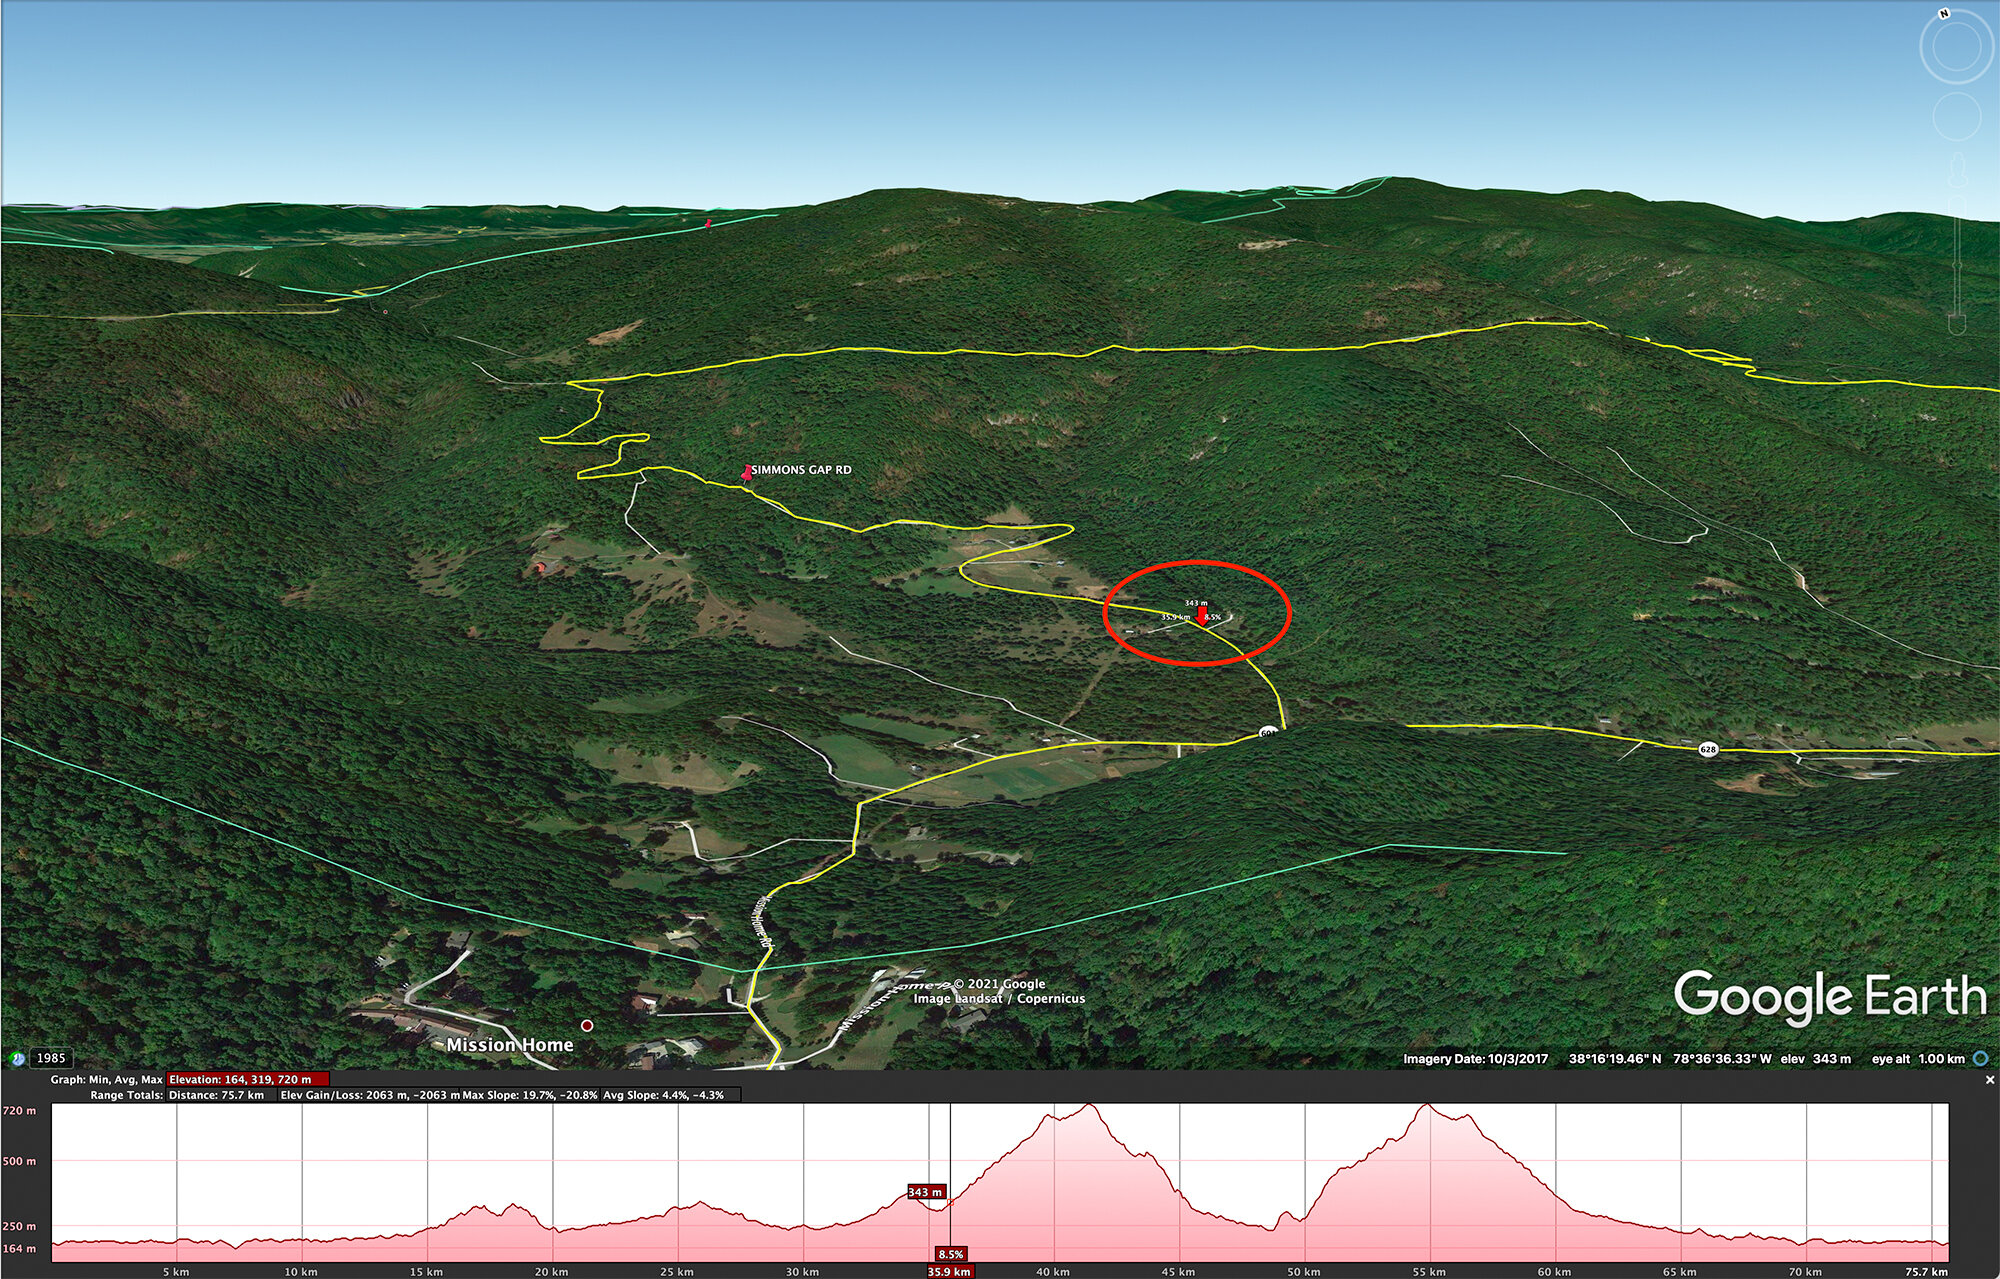
Using Elevation Profile to Inspect a Climb
You can also click and drag over the elevation profile to select a particular section of the profile (for example a climb that you want to study). The corresponding selection will be highlighted on your route and you'll also be able to see the summary stats for that selection along the top of your elevation profile.

Use Elevation Selection
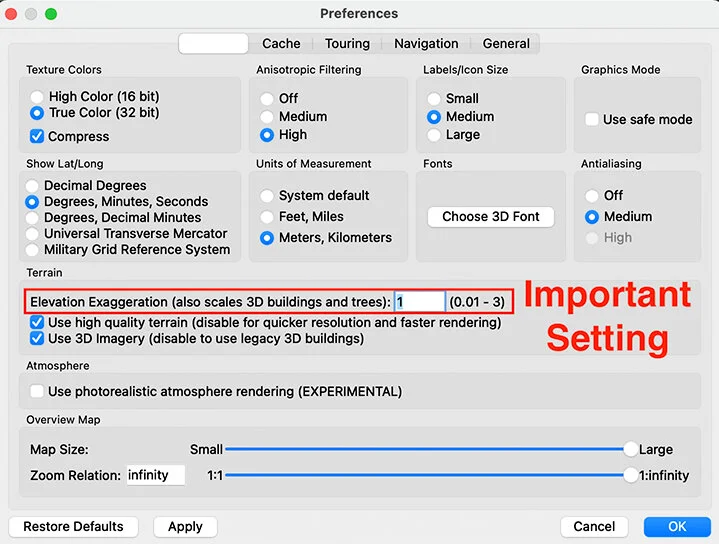
Tip 3: Adjust the Elevation Exaggeration Setting
I think most cyclist know that feeling when you've exhausted yourself during a ride and even the smallest hills feel like massive mountains. Google Earth Pro does have a hidden setting that can visually exaggerate the elevation of the terrain to make those small hills quite literally look like massive mountains. If you aren't careful with this setting, then many routes might look completely unrealistic on the screen, which could put you off from ever attempting them. You can access this setting as follow:
On a Mac: Click on Google Earth Pro and then Select Preferences
On Windows: Click on Tools and then select Options
Within this settings panel, you'll find the Elevation Exaggeration number which ranges from 0.01 to 3. You'll have to experiment with this setting to gauge what number provides the most realistic appearance of the map. Anything beyond 1.5 will over-exaggerate the elevation and I've found that a setting between 0.7 to 1.2 works the best for most of the routes that I want to inspect. Just for fun, set the value to 3 and you'll quickly see how a few small rolling hills can be made to look like massive Alpine mountains. Maybe you can use this as a scare tactic to freak out your riding buddies before your next ride!
Tip 4: Use the Layers Panel
Below the Places panel, you'll find the Layers Panel that will allow for additional information to be displayed on the map. You can check and uncheck the relevant boxes as required. The 3D Buildings and Terrain selections can be left turned on, as both help to provide the 3D look that you want to see on your map. Three of the other selections might be of interest to cyclists:
1. Borders and Labels - Borders are handy if you need to know where on the map county or state lines are situated. Labels, once turned-on, display the names of all Cities/Towns on the map along with a few other high-level points of interest (like mountain peak names).
2. Places - The information provided with this layer really helps to fill in a great amount of information when it comes to points of interest along the route. When Places is selected you can easily see if there will be a place to stop for food or drinks in a particular town along your route.
3. Roads - This one is fairly self-explanatory and adds all the names/numbers that are associated with the various roads on the map.

Tip 5: Use Place markers
The last tip on my list relates to the use of place markers to help identify particular spots that you'd like to mark on the map. Maybe you want to point out a particular road, coffee stop or even an overnight camping site on the map. This is where the use of place markers become super useful, since it allows custom information to be visible on the map, alongside your route.
To insert a place marker, simply select the yellow pin icon in the top toolbar. You'll then be able to move the pin to any spot on the map. You can give that pin some custom text and you can even change the shape and appearance of the pin on the map by clicking on the pin icon next to the name. The level of customization is plentiful, and you'll be able to mark a point on the map in the exact way that you'd like.

Add Custom Info to Maps Using Place Markers
Wrap-up
Truly studying a route before you embark on a bike ride brings with it a great sense of confidence and peace of mind. Whatever the terrain throws at you, you can pedal along knowing that you've done your homework about what lies around the next corner. Things like where you can stock up on supplies along a ride, what gear you might need, and the intensity of the course are all variables that can be grasped so much better. Perhaps you're someone who likes the thrill of the unknown and finds detailed inspection of a ride map to be equivalent to a movie trailer that spoils the whole movie. In that case, simply ignore all that I've listed here today, but should you want to gather as much info about a particular cycling route as possible, then the extra effort and time invested to make use of Google Earth Pro will be well worth it the next time you're out in the middle of nowhere during a ride. I've used this quote in the past, but think it helps to sum up the whole point of this post - Proper preparation (planning) prevents poor performance!
Have you ever misjudged a route, with the result of being stranded out in the middle of ride? If so, tell us about it in the comments below!
- Wiehan